How to make a small fireplace with your own hands. Do-it-yourself fireplace in the country. DIY fireplaces drawings and design
You will need
- - brick;
- - cement;
- - water;
- - sand;
- - pipes;
- - metal and wire gratings;
- - wire;
- - chimney;
- - pipe;
- - shovel;
- - crushed stone;
- - tin;
- - slag concrete;
- - roofing material;
- - roofing iron;
- - facing material.
Instructions
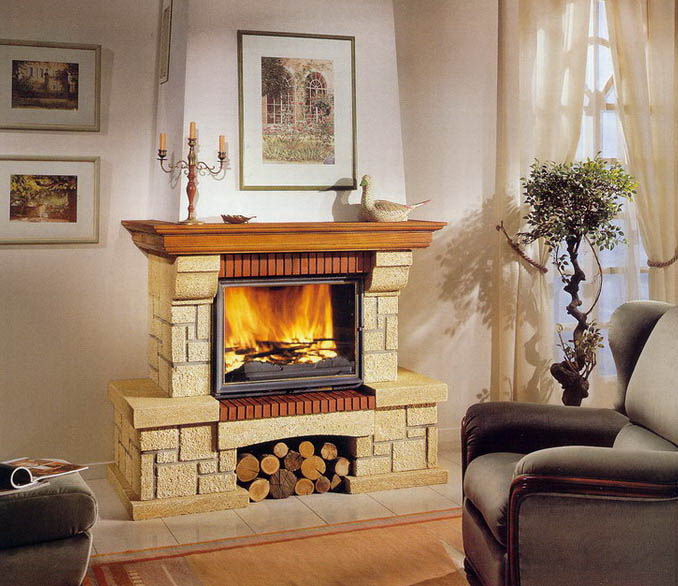
There is always a wall in the house that can be cleared of furniture and a fireplace installed. It is best to choose the wall opposite the window. The firebox is made of concrete, the chimney is made of brick or stone. To lay the platform in front of the fireplace, you need to choose a flagstone or a concrete slab.
You can install a hearth fireplace anywhere in the garden. Lay out the fire zone in such a structure from stone. You can make the umbrella and pipe from tin.
The simplest fireplace stove can be easily made from cinder concrete slabs. To do this, take cinder-concrete hollow slabs and lay them on top of each other. Pull it tight with wire. Strengthen the grate on top of the oven, leaving holes at the bottom for air access. For cooking purposes, install another rack halfway up the oven height. In the first case, make the chimney at the top, in the second - in the middle of the stove. Be sure to leave a hole under the chimney grates for fuel. By adjusting the lower hole - the blower, the strength of the fire is set.
Choose refractory bricks; the color scheme can be any. It is best to immediately check the quality of the firing at the time of purchase. Hit the brick - a metallic sound should be heard. If you break a brick, it will break into large pieces and can also be easily chipped away.
Dig a pit no more than 65 cm high, line the bottom of the structure with crushed stone, and then pour cement into it, making sure that the cement is thoroughly mixed in water and sand (in a ratio of 1: 1: 3). The top part of the finished piece should be 7 cm below the floor level. Then start laying the brick. Take roofing felt and cover the foundation with two layers of material. Then dilute the cement with water and use it to lay the first row of bricks, remove any excess with a damp cloth. Wipe down the chimney and firebox walls. Use the staggered brick laying method to install the fireplace coving and chimney. Attach a piece of roofing iron to a piece of brick and cover the pipe hole with it.
Install a metal grate in front to prevent coal from falling out, as well as a wire mesh to prevent sparks from flying from the fireplace while burning. You can use ceramic tiles, brick, slate or marble as facing materials. There are also fireplace cladding kits on sale.
Install a vertical chimney. If this is not possible, the maximum inclination should not exceed 60 degrees. Protect the structure from proximity to wooden furniture to avoid fire. To do this, take asbestos, make gaskets from it no less than 25 cm thick, and place them near the fireplace.
Country houses are often not inhabited permanently (especially in winter), so there is a certain problem with heating. But a mini-fireplace for a country house will be a good help in this regard, which can quickly raise the temperature in one room while the main heating system heats up the entire building.
We will look at some designs of such devices, and also see a video in this article that will clearly outline the topic.
Fireplaces
Note. There is a misconception that a fireplace is not capable of heating the entire house, but in fact this is not the case.
Despite the fact that the thermal effect is largely due to infrared heating, that is, from the heating of objects surrounding the firebox, a closed firebox allows you to install a water jacket or simply work with the effect of a conventional cooking stove.
Styles

- The U-shaped shape of the built-in portal and the open firebox indicate that this is a classic style heating design.. Although recently the firebox is increasingly being made closed - this increases the efficiency when burning fuel.
A damper or door that regulates the air flow into the combustion chamber can make it smaller, therefore, the rate of release of hot gases into the chimney will also be less, thereby maintaining heat in the room. Marble is most often used to finish classic designs, but it can also be ceramic tiles, steel, cast iron and even wood.

- Not so long ago, starting from the second half of the 20th century, “modern” and “high-tech” styles began to come into fashion - which, in fact, are difficult to distinguish from each other, since in both cases minimalism is inherent, what makes such heating devices convenient for a small country house. Most often, metal (steel or cast iron) is used as a building material, and the structure itself is mounted in a wall or a cabinet specially equipped for this purpose.

- At the end of the 20th century and the beginning of the 21st century, an architectural style arose called bionics, which, in fact, has no straight lines and angles - all forms are streamlined and as close as possible to natural conditions. Each of these fireplaces, in fact, is a work of art, so their price is quite high and there is no point in installing such a heater in a rarely visited room.

- Electric heaters of this type are fundamentally different from wood-burning and coal fireplaces, which require a chimney. Here heating occurs due to weak injection of hot air by a fan, or using infrared radiation.
But here it is possible to design the portal in almost any of the above styles, in addition, you see a picture of burning wood or coals, which creates the feeling of using natural fuel. Even if your home is not electrified, renting a diesel generator for your dacha will solve this problem.
We turn what we want into reality
Note. You can pay attention to the fact that no instructions oblige you to make a fireplace as exclusively a heating device - the presence of a hob will allow you to cook food and boil a kettle, which is very convenient for a country house.

First of all, it should be noted that small fireplaces for summer cottages must, in any case, perform their heating functions. This means that such a device must occupy at least 1/50 of the area of the entire room.
Imagine that the total area will be 20m2, therefore, a heating device of this type should occupy 20/50=0.4m2. The height of such a structure will depend on the height of the ceilings, the architectural style, as well as your own preferences.

Note. If you decide to install a fireplace with an open firebox and a direct chimney (without an attic bed or draft wells), you receive an additional means of natural ventilation of the room.

Let's say that we need to build a fireplace on a previously agreed area of 20 m 2, therefore, its width can be in the range of 70-80 cm, and its height 55-65 cm with a firebox depth of 35-37 cm, the back wall will have a height of 35 cm and about 50 cm wide.
If the chimney has smooth walls, then its cross-section for a room of 20 m 2 can be made 14 × 27 cm and 27 × 27 cm with rough walls. In cases where the area exceeds 20m2, but not more than 25m2, then for both smooth and rough walls of the chimney its cross-section should be 27x27 cm.
As you understand, the draft must be adjustable, therefore, you will need a stove grate, valve or damper. But before you begin installing the heater, you absolutely need to make a floor, even if these are country houses made of block containers - there should be no flammable or fusible materials on the floor.
As an option, for this kind of protection, a fireclay brick flooring is laid or a sheet of galvanized sheet is simply laid down.
Regardless of whether the fireplace is on a pedestal or on a flat floor, the fireproof part of the base must protrude at least 1/3 of the firebox along with the walls. For example, if the depth of the firebox is 36 cm plus the walls, it will be about 50 cm, which means that the protrusion should be at least 18-20 cm from the outside of the door.
When counting bricks, be sure to take into account the layer that will go on the base; therefore, the amount of fireclay will be determined by the base and height of the firebox. For the rest of the structure you will need ordinary ordinary or decorative (facing) brick.
As a rule, the masonry begins from the back wall (after arranging the pallet) and is made in two layers - the inner one is made of fireclay, and the outer one is made of ordinary brick, that is, we erect the masonry from the portal base to the base of the chimney. In order to create a thermal reflection angle towards the floor, the rear wall is made with a smooth slope of approximately 20⁰, so you will direct the heat flow to the fuel mirror.

After this, the fuel mirror itself or the pan is laid out, which will rise 15-20 cm above the base. Next, place a smoke collector (“smoke tooth”) in the shape of a pyramid, where there will be a chamber for collecting and cleaning soot.
Do not forget about the stove valve, which should be located either in the chimney structure, or slightly lower, but in any case above the “smoke tooth”. With this design, a shelf is formed on the outside of the chimney, which can be used for both decorative and household purposes.

Conclusion
You can build a fireplace in your dacha with your own hands, even without much experience in stove construction, since here you won’t have to invest in a complex system of draft wells, which you cannot do without. As a last resort, you can purchase a small electric fireplace, which will save you not only from construction work, but also from the debris that certainly accompanies the installation of such a device.

The presence of a fireplace in any home makes it cozy and fills it with warmth. But, unfortunately, the cost of a purchased fireplace is too high, so it is much cheaper to make it yourself. During the manufacturing process, it is possible to select the type of device that will harmoniously combine with the individual characteristics of the room and the overall style of the interior. Let's look at how to make a fireplace for a summer house with your own hands below.
A classic option for constructing fireplaces for a summer residence
This version of the fireplace requires the presence of:
- chimney;
- fireboxes;
- smoke chambers.

The initial stage of its construction is determining the location of the fireplace in the country house. In this case, the ease of use is taken into account first of all. In addition, you should take into account the possibility of the location of the chimney. Also, the installation location should be easy to maintain both outside and inside the premises. The chimney pipe for both the fireplace and the stove should be 200-300 mm higher than the ridge. With a central location of the fireplace, the head of the chimney is located near the ridge. This option involves easy installation of the chimney, simple installation and dismantling of the air damper. In addition, in this case, cleaning the pipe from soot is easy and convenient.
Installation of brick fireplaces for a summer residence near the central wall of the room, if necessary and desired by the owners, is possible. Although in this case, cleaning the pipe and installing the chimney is much more difficult. To solve this problem, temporary means of scaffolding are installed during construction work. For example, a special ladder is installed to allow the fireplace to be serviced from outside.
The next stage of construction is choosing the appearance of the fireplace portal. It depends on many factors, such as the location of the fireplace, the overall style of the interior and the general wishes of the owners.
It is possible to construct wall-mounted, wall-mounted, or floor-mounted fireplaces. Each of them has its own advantages and disadvantages. The most common are wall-mounted fireplaces; in addition, they are the most convenient to use and take up little space. The finishing of the portal can be very diverse, ranging from brick or stone masonry, ending with wood, metal or ceramic tiles. It all depends on what materials the walls in the dacha are made of and how they are finished. In addition, corner fireplaces for dachas are quite popular; with their help it is possible to save space. By such a fireplace you can comfortably sit in a rocking chair and look out the window.

Please note that the materials used to construct the fireplace must be non-flammable and fireproof. Since at high temperatures and the presence of fire, there is a risk of fire.
When installing a fireplace in a two- or three-story building, its weight exceeds a ton, so due attention should be paid to the arrangement of the foundation. The best option is to install a concrete poured foundation. This type of foundation is characterized by high strength and long-term performance characteristics.
When arranging this type of foundation, it is necessary to carry out concrete reinforcement work using mesh or reinforcement rods. The easiest option is to use a reinforcing bar with a periodic profile. To build a foundation on solid ground, you will need reinforcement with a diameter of about one centimeter. When carrying out work on soft soils, the diameter of the reinforcement increases by 2-4 mm.
Start the process of building a fireplace by designing it. Accurately measure all the components and details of the fireplace, and transfer them to paper. Next, based on the measurements, you should buy the material.

To build a foundation, you will need:
- cement about 45 kg, the amount depends on the size of the fireplace;
- sand about 90 kg, based on 45 kg of cement;
- coarse crushed stone - 90 kg;
- reinforcing bars - the quantity is affected by the size of the structure;
- edged boards, 3 cm thick;
- hammer;
- grinding machine;
- nails 7 cm.
When constructing the foundation of the cabinet you will need:
- sand and cement in a ratio of one to three;
- rubble stone, in relation to the size of the fireplace.

To make a fireplace for a wood-burning cottage, you should prepare:
- fire-resistant brick, its quantity should be calculated based on the design of the fireplace, keep in mind that it will be needed both for the construction of the fireplace and for the chimney;
- 50 bricks will require about one bucket of clay;
- about 10 kg of sifted sand, half a bucket;
- prepare the grate;
- an air smoke damper installed in the pipe;
Classic fireplace manufacturing requires the presence of two such dampers. They are located at the top and bottom of the pipe. The type and shape of the damper is determined at the design stage and depends entirely on the diameter of the pipe.
- take care of the presence of a decorative grate for the firebox;
- about the mantel;
- and a set of tools to help maintain the fireplace.
To lay brickwork you will need:
- a tank in which the clay will be kneaded, with a capacity of 12 liters or more;
- a plaster ladle, which will be used for mixing;
- trowels;
- rubber hammer;
- picks;
- plumb line;
- building level.
The height of the chimney pipe is influenced by the height of the building itself and the ridge located on the roof. The size of the pipe should exceed the height of the ridge by several bricks. The internal diameter of the pipe is influenced by the inlet located in the firebox. The inlet hole in the firebox should be five times larger than the diameter of the pipe, then the draft will be good. A brick fireplace assumes a constant cross-section, that is, a passage size. With the help of specialists, or with certain skills in chimney installation, the pipe is made narrowed at the top, this procedure helps to increase draft.
Before starting construction, care should be taken to check the availability of all necessary materials and their quality. Sort the bricks; if there are small cracks in the material, set it aside; it will be used when you need to use half the brick.
Next, start preparing the clay-sand mixture. To check its quality, you need to prepare seven bricks, connect them with mortar and lay them in a column overnight. In the morning, grab the structure by the two top bricks; if the rest have not fallen off, then the mortar is of high quality.
Before laying bricks, the clay is soaked in water for 24 hours. If you don't have time to soak, soak the clay in warm water for a shorter period of time.

To build a foundation for a fireplace, you need to disassemble the floor, determine the type of soil and the depth of the foundation.
In relation to the size of the fireplace, make markings for arranging the foundation. Please note that its size should be 15 cm larger on each side to ensure evenness of the structure and installation of the formwork.
Do not install a fireplace foundation adjacent to or connected to a building foundation. This procedure will significantly deteriorate the quality characteristics of both foundations and reduce the service life of the building.
If the soil is hard, then the foundation is laid at a depth of up to 80 cm, otherwise, a depth of more than one meter will be required. To make a foundation on hard soil, you will need to build formwork. To construct it, you will need boards 20 cm high. This is followed by the process of laying the reinforcement. The laying step is 50 cm.
It is better to prepare the concrete mixture in a concrete mixer. Since all the ingredients will mix in it and you will get a homogeneous consistency. This will significantly improve the quality properties of concrete. First, the first layer of reinforcement is poured and vibrated using a concrete vibrator. It will help remove excess air from the solution and improve its strength.
Place the second layer of reinforcement on the pre-poured concrete and proceed with subsequent pouring. The surface of the foundation is covered with plastic film for 12 hours. Next, the film is removed and the formwork is dismantled. Please note that this procedure must be carried out with extreme caution, since the concrete is still very soft. Next, install the formwork to fill the fireplace cabinet; its size fully corresponds to the width and length of the fireplace itself.

After installing the formwork, fill the base with a solution mixed with rubble stone. Cover the surface with plastic wrap and wait for the foundation to dry.
The best option is to raise the cabinet a few centimeters higher than the finished floor. This process will improve and simplify your flooring installation and fireplace finish.
After twelve hours, the formwork is dismantled and the polyethylene is removed. All excess areas on the sides of the foundation are covered with soil and compacted. To improve shrinkage, it is recommended to water them. After another twelve hours have passed, begin laying the brick.
Use a plumb line to check the corner areas and attach it to the ceiling using hooks. In the process of laying bricks, you should strictly adhere to the rule that states: a minimum amount of clay ensures the reliability of the masonry. The layer of clay mortar between the bricks is no more than 4 mm.
The main task of the fireplace is to ventilate the room, but not to heat it. Namely, due to the presence of ventilation, the fireplace is not able to fully fulfill the role of a heater. To correct the situation, the installation of a heat-resistant door is required. With the help of thermal radiation, the room will be heated by the heat that the fireplace emits.
To increase the efficiency of the fireplace, you will need to install a boiler in the combustion chamber. This design is characterized by the presence of:
- boiler;
- pipeline supplying hot water;
- radiator for heating;
- flow of warm air.

The boiler comes into direct contact with the flames burning in the fireplace. From this device, water enters the radiator, thereby heating it. The cooled water again enters the boiler and heats up in it. Thus, a circular movement of water in the system is obtained. It is possible to install a stationary boiler. To install it during brick laying, the presence of threaded pipes should be provided. Also, the water system can be removable. Although the aesthetics and appearance of the fireplace will suffer a little, the efficiency will increase several times.
Cast iron fireplace for a summer residence: installation features
Before moving on to the actual installation work of installing a cast iron fireplace, we suggest studying its advantages and disadvantages.
The presence of a closed firebox in the fireplace ensures complete safety of its operation. Therefore, such a fireplace is most welcome in a house with small children.
The design of the closed firebox has the form of a cast iron chamber designed for fuel combustion. One of the sides of this chamber looks like a glass door through which the flame is visible. The door, which is equipped with lifting parts, is easy to use. With their help, the firebox takes on an open appearance, that is, it is universal. An ash pan is located below the combustion chamber; it is the place where air is supplied to the chamber. The upper part of the firebox is equipped with a smoke exhaust pipe. The installation procedure for a cast iron fireplace involves constructing a portal that will give the stove the finished appearance of a fireplace.
Among the advantages of a closed cast iron firebox are:
- the presence of heat storage devices that significantly increase efficiency;
- the presence of a variety of models that differ in shape, type and appearance;
- the ability to replace damaged parts;
- longer service life than brick fireplaces;
- a high level of fire safety is ensured by the absence of open fire;
- the cost of such a fireplace is much lower than a brick one;
- ease of installation.

Among the many advantages of such fireplaces, there are several disadvantages:
- visibility of the fire is more limited than that of models with an open firebox;
- maintenance is required, which consists of periodically cleaning the glass door;
- The standard firebox is distinguished by its black color.
One of the main advantages of such fireplaces is that there is no need to build a foundation. Therefore, they are easy to install in an already renovated room.
First, decide where to install the fireplace. It should be convenient for the location of the chimney. To install a fireplace, it is necessary to build a base that looks like a concrete screed with reinforced elements. Next, waterproofing is laid, and when installing a fireplace on a wooden floor, it is necessary to carry out thermal insulation.
The thickness of the layer for screed equipment is 100-150 cm. To perform reinforcement, use a metal mesh. After waiting for the concrete to harden, begin installing the structure on which the firebox will be supported. Brick, aerated concrete blocks or other alternative materials are used for its construction. It is possible to purchase a ready-made brick plinth made from natural stone.
If you have a not particularly strong floor, it is better to give preference to aerated concrete, as it is highly durable, but at the same time very light. With its help you can build a structure of any shape and size. Further finishing of the fireplace involves plastering it and covering it with ceramic tiles, natural or piece stone.
The blocks are connected to each other with a special adhesive mixture or ordinary sand-cement mortar. To level the surface, you need to apply a layer of putty up to two centimeters thick.
A thermal insulation layer, in the form of asbestos cardboard or steel roofing metal, should be laid on the base under the firebox.

Tip: When choosing a place to install a fireplace, consider the fact that there must be space between the firebox and the fireplace wall to install a system that provides convection heating. In this case, the length of the chimney must be such as to lead this system to the outside of the building.
To ensure the correct installation of the firebox, it is necessary to place wooden blocks in place for its installation, with the help of which the firebox will be leveled. After installation work, the bars are removed. A metal sleeve or pipe is used as a chimney. They need to be installed in a specially made hole through which the pipe is led out into the street. When carrying out this process, all fire safety rules should be taken into account.
Please note: There are several maximum standards for the vertical deviation of the chimney pipe. With a total pipe length of less than 500 cm, the maximum deviation should not exceed forty-five degrees, with a length of more than 500 cm, no more than twenty degrees.
To facilitate the finishing of the fireplace, it is necessary to build a frame on which any of the finishing materials will be attached; to do this, you should perform a number of actions:
- use a thin-walled steel profile or corners; to connect them, use metal screws;
- thermal insulation is attached to the inside of the frame, and cladding to the outside;
- It is recommended to use thermal insulation mats as thermal insulation; attach them in such a way that the side with the foil faces the firebox;
- any material is used for cladding the frame, in the form of gypsum board, wood, asbestos-cement slabs;
- The thermal insulation of the cladding must have holes so that the heat from the fireplace enters the room.
Options for finishing fireplaces for wood-burning cottages
1. An excellent option for decorating a fireplace that will fit into any interior style is wood. Please note that wood requires pre-treatment with fire protection. The best option is to use MDF. In this case, the firebox is equipped with a protective screen that protects the wood from possible fire. The fireplace portal should be 10-12 cm larger than the firebox itself, this will help prevent it from heating up.
2. Tile tiles are distinguished by a wealth of colors and shapes. To finish the fireplace, you can use glazed tiles, terracotta tiles or porcelain stoneware.
3. The use of tiles will give the fireplace a luxurious appearance. In appearance, they resemble tiles, and differ from them in their textured surface and greater weight. Technology and installation require their fastening using metal wire.
4. Heat-resistant mosaic is an excellent option for decorating a fireplace portal. With its help, it is possible to create incredible designs that will complement any type of interior.
5. Marble, plasterboard, decorative plaster - will perfectly decorate the surface of the fireplace. In this matter, imagination is limitless. The main condition is the use of heat-resistant and fireproof materials.
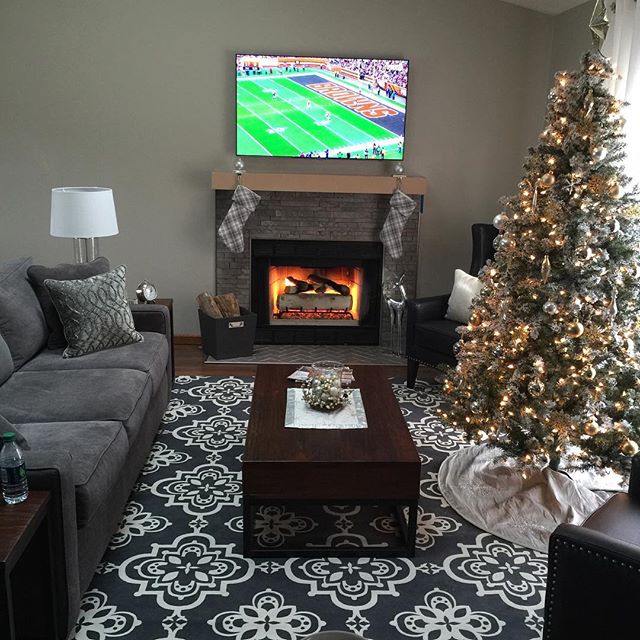
Almost every person dreams of a hot fireplace where the whole family can gather on cold evenings. And if it is quite difficult to install it in an apartment, then it will look great in a country house. A fireplace in a country house is needed not only to heat the room, but also to create a special atmosphere of comfort and warmth. You can trust the professionals who will select the design and take care of all the hassle of installation, or you can do it yourself.
Types of fireplaces
There are several main types of fireplaces:
Wood-burning. A traditional hearth model, perfect for summer cottages.
Consists of a firebox, chimney and portal. The design of the latter can be changed to suit the interior of the room, which allows the model to fit well into a room of any style. It is quite difficult to build such a fireplace; any mistakes lead to a lack of draft, which is why the smoke will remain in the room.
It is necessary to plan the installation of this model during the construction stage; it is recommended to install a foundation made of brick or concrete.
Gas - equipped with an atmospheric gas burner. Relatively inexpensive and safe option. They have many advantages, such as ease of installation and the absence of difficulties with chimney installation. Disadvantages include low efficiency and the need for permission to install.
Electrical. Most often they play a purely decorative role, since they generate little heat. Quite popular due to fire safety, easy maintenance and lack of a chimney.
According to their location, the foci can be:

- Wall-mounted. As the name implies, they are located near the wall and can be installed after construction.
- Hanging. They do not have horizontal support and, together with the chimney, are fixed to the wall. Externally, this model resembles a painting; the portal is made so that its design resembles a frame.
- Built-in. In this model, the firebox and chimney are completely hidden in the wall, only the portal is visible. They are installed in a special niche in the wall; it is advisable to plan their purchase at the stage of construction or major renovation.
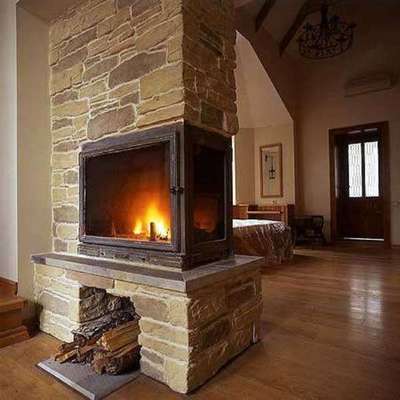
- Island. They stand alone and are open on all sides. Known to be the most beautiful hearths, they are difficult to make and take up a lot of space.

Fireplace selection criteria
A fireplace for a summer house must be made in accordance with the following criteria:
- room area;
- length of stay in the house during the year;
- installation and its cost;
- design and its cost;
- Model efficiency;
Traditional fireplace for a summer house

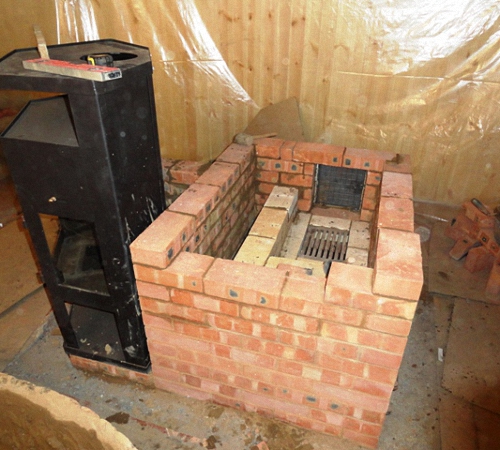
Long-burning stove-fireplace
Let's look at how to make a traditional wood-burning fireplace in your country house with your own hands. First of all, you need to carefully design it, calculating the dimensions, location and cost. The latter strongly depends on the following criteria:
- Type of fireplace and material of its finishing. For example, finishing with brick or stone will cost more than finishing with plasterboard or ceramics.
- Ceiling height and number of floors in the house.
- The material from which the walls are made, the need to create additional insulation.
- Building foundation.
Construction of a traditional fireplace
Fireplace laying diagram
The hearth consists of many elements, the main ones being the firebox and chimney. The firebox is the most important part of the fireplace; it is where the fire burns. The inside is lined with some heat-resistant material, for example, fireclay brick masonry is often found.
This is necessary to regulate temperature changes - so the fireplace can heat the room even after it is turned off. In addition, this protects the remaining materials from which the device is made from deformation.

The chimney is the second most important element of the fireplace, providing air circulation.
In addition to them, the fireplace contains a smoke collector, a grate and an ash pan. Models with a closed firebox have a protective door that allows you to admire the flame without fear of sparks and soot.
The outer part of the device consists of a portal that determines the design of the product.
Materials
To make a fireplace yourself, you will need materials such as sand, cement, clay, brick, etc. etc. When choosing a brick, it is important to pay attention to its quality; it should not have flaws.
Tools needed: grinder, trowel, notched trowel, rubber mallet and building level.
Fireplace installation
First of all, you need to decide on the location of the fireplace. It is important to remember that the fireplace should not be placed in a draft, near stairs or in small rooms. The size of the room in which the device is installed must be at least 15 - 20 square meters. m.
It is necessary to draw drawings to mark the foundation. It is important that the base area should exceed the planned dimensions of the fireplace by 10 cm.
The foundation is installed as follows: First, sand is poured in layers. Each layer must be moistened and compacted. The cheapest option would be a base made of rubble concrete. For this reason, it will be necessary to make formwork from boards, cover it from the inside with roofing material and install it in a trench. After this, you can begin laying rubble concrete.
Then the cracks between the stones are filled with crushed stone and filled with cement mortar. After one layer has dried, you need to install the second. The top layer is leveled and covered with polyethylene. After installing the foundation, you must wait a week before starting work on laying the fireplace. Before installing the fireplace, the clay must be soaked for several days. Then it is mixed with sand and a mixture for masonry is obtained. The brick also needs to be soaked to remove air bubbles.
The laying itself is done from the corner to the outer row, then to the center. The firebox must be made of fireclay bricks. After this, the chimney is removed and the holes are protected from leaks using special caps and chimneys.
The last step is grouting and finishing.
It’s quite easy to build a fireplace in your dacha yourself; you just need to know the basic rules for choosing a location and installation.
Video: How to choose a fireplace stove for your home or garden?
Having a fireplace in your country house will provide you with warmth, coziness and comfort on winter and autumn evenings, and will also add romance to your everyday life. We will talk about how to build a fireplace with your own hands in this article.
How to build a fireplace with your own hands in a country house or in a private house
Essential elements
The fireplace consists of several main elements, which include the body, foundation, smoke collector, firebox and smoke channel. In order for the fireplace to function properly, it is necessary to have the correct ratio of the sizes that its elements have.
The fireplace foundation is made from rubble stone or red brick, as well as from rubble concrete and concrete blocks. If you are building your fireplace in damp soil, it is recommended to build the foundation from rubble stone. In the same case, if you are laying a foundation in dry soil, it would be advisable to use a limestone solution, which consists of 1 volume of lime and 1 to 3 volumes of sand (which depends on the degree of moisture content of the lime).
Solution
To prepare the solution, lime is mixed with water until the consistency of sour cream, after which sand is added. For foundations that are laid in wet soils, the cement mortar should consist of 3 volumes of sand and 1 volume of cement. The dry ingredients are thoroughly mixed beforehand and then diluted with water.
Foundation pit
The pit that is supposed to be used for the foundation should be approximately 50 mm larger in length and width than the foundation for the fireplace. Its bottom is leveled using a level. The first row of the fireplace foundation is laid dry from stone or crushed brick.
Stones or crushed stone are compacted into the ground, after which a liquid solution is poured on top. In the future, the masonry is carried out in regular rows, observing the dressing of the seams. To prevent moisture from penetrating into the masonry on top of the foundation, make an insulating layer of a pair of roofing felt sheets at least 150 mm above the ground level, after which the fireplace is laid.
Fireplace body
Typically, the fireplace body is made of high-quality red or refractory bricks. When using red, it will be better to later line the firebox with refractory bricks. The thickness of the brick walls should be no less than half a brick.
In addition, heat-resistant concrete, ceramic blocks or natural stone (excluding silicon and limestone) can be used to construct the fireplace casing. The surface of the body is covered with valuable types of stone, or plastered.

Photo:
You will also need to build a firebox
The depth of the firebox is recommended to be approximately half a meter. At a shallower depth, smoke may enter the room, and at a greater depth, the strength of thermal radiation becomes weaker. The efficiency of the fireplace can be increased by lining the back wall of the firebox with a cast iron plate or sheet steel. In order to achieve better heat radiation, the upper part of the back wall is laid out with a certain slope forward, while the sides are expanded forward towards the hole. The walls of the firebox are usually laid out from fireclay refractory bricks, and such a fireplace will have an efficiency coefficient reaching 17%.
For arranging the floor of the firebox

Photo:
Usually some type of fire-resistant material is used - for example, concrete, granite, clinker. It is necessary to provide an ash pit for collecting ash and coal. The podzolnik is located under the firebox. A cast iron grate is placed between them. The basket is made of steel with a cross section of 10–15x10–15 mm or a diameter of 10–15 mm. Place the basket elements at intervals of 15–20 mm. Its legs should have a height of about 80–120 mm. During the combustion of wood on a basket, fine coal and ash are collected on the hearth and removed after the fireplace has cooled.
Now let's talk about what a portal is
Portal- an element of a fireplace, on which its functions as a heating device largely depend. The portal can be installed on one, two or three sides, depending on the architectural design of the fireplace and its location. In the case where the fireplace is freestanding, it may have a circular portal. The shape and proportions of the portal are established taking into account the harmony of the fireplace design as a whole.
From firebox hot gases enter the smoke collector

Photo:
A smoke collector is a pyramid-shaped expansion located at the bottom of the chimney, which serves to prevent the rapid descent of cold air flows down the chimney.
Soot and soot are collected here when cleaning the chimney, which are then removed through a hatch located in the rear wall. At the same time, the damper, located slightly lower, provides protection against soot and soot entering the room.
The smoke collector is made of red brick (grade 200). In addition, it can be made from iron sheets, which will provide rapid heating of the room. To improve the aesthetic qualities of the fireplace, as well as to cover the hot metal smoke collector and ensure its fire safety, a protective casing is made from sheet copper. The burnt-out metal smoke collector is replaced; At the same time, it is necessary to take into account the possibility of such a replacement when thinking through the design of the fireplace.
Gas threshold

Photo:
Cold air falling down to the chimney can, bypassing the smoke collector, enter the room, while carrying smoke with it. To avoid this, a gas threshold is installed in the rear wall of the chimney - a barrier in the form of a protrusion, which allows cold air to mix with hot air and the resulting mixture is discharged upward into the atmosphere. The width of the gas threshold should be equal to the chimney, or be 10–15 mm larger than it. The required width of the gas threshold will ensure its normal functioning and will allow it to retain soot that falls off the chimney. The cross-section of the chimney should not be narrowed by the threshold.
Smoke damper
A smoke damper is placed between the smoke collector and the firebox to prevent cold air from entering the room when the fireplace is not operating. This damper provides coverage of the entire width of the channel. Its width should be approximately 1/16 of the height of the portal.
Its area is taken to be 1.25 times larger than the cross-section of the chimney. Opposite the gas threshold, a cleaning facility is built, hermetically sealed with a door. Through it, the soot that collects on the threshold is removed.
Chimney
It is prohibited to build horizontal chimneys, so the chimney must be vertical. If the fireplace is attached to a wall in which there is a smoke duct, then in extreme cases the chimney can have a slope of no more than 60%. Chimneys are usually made of red brick.
To improve draft and prevent precipitation from entering chimneys, deflectors are installed on them. Chimneys must be insulated with asbestos gaskets from the wooden elements of the building. The minimum distance between wooden elements and chimneys should be at least 250 mm.
Floor protection
In addition, the part of the floor (at least 0.5 m) located in front of the fireplace must be covered with sheet iron or constructed from non-combustible material.
Fireplace size chart


