Grain mill: purpose and operating principle. Homemade grain mill Do-it-yourself windmill for grinding grain
All farm owners know how useful a personal grain mill is, which is easy to make with your own hands. Using this design, you can renew food supplies for rabbits or crush fruits and vegetables. This device is also useful in the home. It can be used, for example, to crush grain crops and obtain flour.
A grain mill is extremely necessary in agriculture for preparing coma for animals.
However, finding a budget mill on the agricultural market is quite difficult. A hand mill is suitable for some, but most people build a full-fledged structure with an electric motor themselves. This will require turning skills and the ability to use a welding device. It is advisable to construct the structure if there are old household appliances or their individual elements at home.
How to build a mill from a vacuum cleaner?
You should not get rid of your old vacuum cleaner, as its motor is perfect for building a small mill. You will also need to prepare the following elements:

- wooden pins;
- plywood sheet 1 cm thick;
- a steel plate that will be used as a knife;
- metal strip;
- bunker;
- welding device.
It is recommended to draw up a drawing of the mill, but photographs of finished units can also be used. First of all, you need to prepare the base of the device. In this case, you can use a sheet of plywood, from which you need to cut a square with sides of 30 cm. On top of the sheet you need to install the working motor from the vacuum cleaner so that the shaft protrudes down approximately 4 cm.
Return to contents
Cutting knife
The main element of the mill is the knife, which will rotate at high speed and grind the grain. This device is manufactured separately. To do this, you need to prepare a steel plate 200x15x1.5 mm. The material must be strong. Additionally, you can use car holders or other similar devices.
Sharpening a knife should be done with a sharp blade. Edges should be processed in the direction of the torsion axis. The shape may vary. For example, it may look like a propeller. Another option is to simply chamfer the corners. Using sandpaper you need to adjust the horizontal and vertical appearance of the plate.
Next, in the middle part of the manufactured element, you need to drill a hole, the diameter of which corresponds to the shaft of the electric motor of the vacuum cleaner. The knife must be mounted on a threaded tail using a bushing, a nut and several washers of appropriate sizes.
Return to contents
How to make the main elements of the device?

To set up a chamber in which grain will be crushed, you will need to prepare a strip of metal. The length of the element should be approximately 71 cm. The maximum width of the part is 6 cm.
The metal must be rolled into a ring, and its edges bent outward along the perimeter of the chamber. The flanges should have a maximum width of 1 cm. In the future, you can fasten them to the base and install a sieve. To properly fix the crusher on the bottom side of the chamber, you will need to mount 3 wooden pins.
You should know that a mesh with small cells is suitable for flour. For various vegetables, perforated discs are used.
Grain can be fed into the chamber from a hopper, which is attached to the base. You will need to make a small hole in it and install a damper made of a plate, with which you will adjust the grain supply.
You will definitely need to place a large bucket or basin under the sieve.
Return to contents
How to make a crusher?
To construct this device you will need a rotor and a stator. A box on which an electric motor with a low power of approximately 1-2 kW is mounted is suitable as a stand for the device. It is allowed to use the device only with one phase.
The mill body is a round metal platform with a diameter of 30-34 cm. At the bottom there should be a side - the stator. The device is closed with a lid at the top.
Inside the structure there will be an electric motor and a mill. It must be secured so that the bearing of the device slides onto the shaft of the unit on which the rotor is located. During rotation, it will be able to reach speeds of up to 3000 rpm.
You need to attach a bunker on top of the structure using screws. For convenience, you can install a lid that can stop the flow of material, as well as a canvas dust sleeve through which the products will exit the device.
Return to contents
How to make a stator and rotor?

The stator can be made from a metal plate. The plate must be bent, placed in a mold, and one end part must be covered with aluminum so that a container with a lower part is obtained. Element thickness – 4 mm. Next, the workpiece needs to be made ribbed. To do this, cut corners 50x20x20 mm. These elements are attached by welding to the side inside the stator. In the middle part of the device you need to make a recess for the shaft.
To construct a rotor, you need a sheet of metal with a thickness of at least 3 mm. A circle with a diameter of 320 mm should be cut out of it. Next, you need to measure 2 mm from the extreme part, draw a circle again and divide it into 32 parts. The marking area is processed with a drill so that recesses with a diameter of 3 mm are obtained. Cuts must be made from the outside to the recesses. In this case, you will need a hacksaw. At the end, the petals should be bent.
A bushing with a diameter of approximately 30 mm must be fixed in the rotor by welding in the center.
For the structure to function successfully, you will need to mount the stator on the shaft.
Many housewives believe that high-quality food can only be prepared from natural ingredients. Today, even grinding flour yourself is becoming fashionable. There are household grain mills for this. You can buy the unit or make it yourself.
A grain mill will allow you to obtain a product from raw materials, the quality of which is guaranteed by your own choice. The row machine grinds wheat, oats, corn, barley and other grain crops. The output, at the owner’s request, is flour of any type of grinding, flakes, cereals of different fractions, and mixed feed. The household mill is small in size and easily fits on the kitchen table. At the same time, its productivity allows it to cover the needs of the household. The simplest model with a low-power electric drive processes half a bucket of wheat per minute.
The grain mill operates on the basis of a rotary mechanism. It consists of:
- rotor;
- stator;
- electric motor.
The operating principle of such a mill is simple. The grain enters the mechanism through the receiving cup. Inside it is ground with the help of a rotor and stator. The finished flour or other product is poured through the outlet pipe into the prepared container.
Homemade grain mills come in two types:
- Mechanical. Grinding is carried out by rotating the handle using your hands or a simple electric drive. They have low productivity. But assembling the mill is very simple and low-cost. You will experience the pleasant process of turning grains into flour. It is similar to grinding coffee beans in a manual coffee grinder.
- Electrical. Aimed at processing increased volumes of grain. These grinders are a great option for regular use at home. Models with a powerful motor can even grind mushrooms or dried fruits.
Attention! In order for the “filling” of the mill to work reliably, it is placed in a body made of hard wood such as pine, linden or beech. Wood will add pleasant notes to the aroma of flour.
Preparing to assemble a simple mechanism
The proposed model of a household mill is the author's own. It was developed by Udmurt masters. The length of the case does not exceed 32 cm. The height and width are even less. The mass of the assembled crusher is 15 kg. The mill needs a motor with low power, up to 180 W. A motor from an old washing machine or similar household appliance will do. Basic productivity - 1 bucket of corn or 2 buckets of wheat in 10 minutes. The author's assembly diagram for this mill is shown in the photo. In addition to the electric motor, you will need:
- 12 screws and the same number of spring washers for fixation;
- a pair of steel corners measuring 45x45 mm (for motor support);
- steel sheet about 8 mm thick (for the frame);
- and another one, about 3 mm thick, as well as fastenings - 4 bolts;
- studs with nuts;
- a small iron box for the roof (reception cup) and 2 screws for it;
- rotor;
- stator;
- protective cover for bearings;
- coupling;
- metal pipe;
- spacer ring 0.5 mm;
- pair of bearings No. 203 plus 3 bolts;
- steel handle brackets 0.2 cm thick;
- wooden handle.
Attention! In this mill design, bolts of the basic type - M6 - are used everywhere.
Crusher assembly: rotor manufacturing
To manufacture the rotor along with the shaft, stator and cover for the bearing compartment, you will need the ability to use a drilling and lathe. Before working on the mill, it is important to know the subtleties of the process:
- The shaft is machined from round steel or M45 forging.
- The basic diameter of the rotor is 105 mm with subsequent turning to 104.5 mm.
The finished part should be hardened:
- heat in oven to 800 °C;
- cool in oil container;
- heat to 400 °C;
- Set aside to cool at room temperature.
Attention! Quenching cannot be carried out using water; it will negatively affect the strength of the mill.
You can check the quality of the procedure with a file. It should not leave marks on the cutting edge of the tooth.
In the proposed scheme, the rotor rotates on a pair of radial bearings. A spacer ring is attached to the shaft between them. This will allow the bearings to move and adjust to the voltage inside the device. The mechanism will become more reliable and last longer.
Stator and other elements
Making the stator yourself is even more difficult. When turning on the machine, leave a minimum allowance in the workpiece:
- make an opening in the center - 70 mm;
- mark the workpiece based on a diameter of 10.5 cm, mark the locations of future openings, contours
- holes at the bottom and top;
- drill blind holes 2.6 cm deep;
- eliminate the allowance on the wall and cut out a space for the rotor (10.5 cm);
- on the reverse side, cut out a seating groove for the bearings;
- think over and prepare a ring for the seal.
Advice. The stator also needs to be hardened.
Working on machines is the most difficult stage of mill assembly. Therefore, you can entrust it to professionals by ordering parts from them. The stator position is manually adjusted using clamp bolts. The quality of grinding depends on accuracy. The electrical circuit of the mill, in addition to the motor, includes a capacitor (3.8 kmF), a fuse and a switch. All contacts should be closed from direct access.
After a successful trial run, all that remains is to make the frame, secure the apparatus, and attach containers to it for receiving and exiting raw materials. The simplest grain mill is ready.
Have you tried making such a mill yourself?
Homemade mill: video
Is it possible to make a grain mill with your own hands? How is it used?
The home mill is currently used by connoisseurs of a healthy lifestyle to produce flour from various grains - corn, rye or wheat - at home. There are models that allow you to obtain other products - feed and flakes. By making products yourself, you can be confident in their quality.
Types of household mills
There are 2 types of grain mills: mechanical and electric. The former have a lower cost, the latter can cope with a larger volume of grain, but their price is more expensive.
The mechanical device is convenient in that it can be used away from electrical sources. When choosing, you should ask what diameter the millstones are: the larger they are, the easier it will be to process the grain. It is worth paying attention to the material from which the millstones are made - it could be granite or ceramic. The best material is corundum ceramics, thanks to which you can obtain the finest flour.
You should be aware that a home mill is not suitable for processing oilseeds such as sunflower.

Mill "Malyutka"
If you have the technical capabilities, skills to work with a lathe and the availability of materials and tools, a mini flour mill can be implemented independently. In any case, the necessary parts can be ordered from a turner. First of all, before making a mill, you should find the drawings. One of the simplest and most famous models is called “Baby”. It was invented by engineers from Udmurtia, and it compares favorably with other models not only in its small size and simplicity of design, but also in its wide functionality and excellent performance: in 5 minutes it can handle a whole bucket of grain.
Technical characteristics of a homemade grain mill:
- weight - no more than 15 kg;
- average productivity: oats, wheat and other cereals - 0.5 buckets per minute, corn - 0.2 buckets;
- power consumption - 180 W;
- produces 2 types of products - coarse grinding and fine grinding;
- Dimensions - no more than 330x170x170 mm.
List of materials required to assemble the device:
- electric motor (a motor from a broken washing machine will do);
- M16 bolts for securing the engine;
- angle steel is used to make an engine mount;
- galvanized iron for making a box (the finished flour will go into the box);
- rotor, stator;
- bearings;
- axle and 2 M6 nuts;
- cover for the assembly;
- handle made of wood or other material.
The manufacture of the mill takes place in 3 stages: you need to make a rotor, stator and frame. The first is machined from a steel blank with a thickness of 90 mm and a diameter of 120 mm in accordance with the drawing. One of the most difficult parts to manufacture is the stator. Work should be carried out as carefully and accurately as possible, following the drawings. The rotor and stator in this case will work like millstones. The frame can be made of sheet iron with a thickness of at least 8 mm.
Mill from a washing machine
An interesting flour grinder made from a washing machine. This is a simple and powerful device that works on the principle of a coffee grinder. There are no detailed instructions for making such a mill, since each washing machine has individual parameters. The main thing is to understand the meaning of the device: it is not millstones that are used, but the grain is ground by knives mounted on an axis that rotates at high speed. The device uses 2 electric motors installed oppositely, the knives rotate opposite to each other. The speed of work and the quality of the final product will depend on the sharpness of their sharpening. To make a knife, a steel sheet measuring 200×15 mm with a thickness of 1.5 mm is used. Sharpening is done as the knife rotates; you can experiment with it. After sharpening is completed, a hole is drilled in the place where the knife is attached to the axle. The knife is put on the axle and secured with 2 nuts and washers.
It is necessary to make a container from sheet iron or other material from which the grain will flow into the grinding tank. The container and tank are separated by a manually opened valve.
At the point where the finished flour exits the grain mill, a sieve and a container for collecting flour are installed. To prevent losses when the product comes out, it is recommended to use a sleeve made of rubber or plastic (it can also be made of metal).
To prevent mill failure, it is recommended to clean the millstones every week.
Every homeowner has a desire to make their property more attractive. Some people like functional buildings, such as bathhouses, gazebos, sports grounds, etc. Others prefer decorative items along with a lot of green vegetation. There are also those who manage to harmoniously combine functional and decorative buildings with green vegetation. There are quite a lot of decorative elements that can be integrated into the landscape. This article will talk about how to make a decorative mill for the garden with your own hands.

Those times when there were only flat beds, lawns and orchards on the plot near the house are already far behind us. Today, as a rule, dachas are used for friendly gatherings, as creative workshops and for family recreation.
A wooden decorative mill can complement a simple landscape designed in a rustic style. This design can be combined with a decorative antique well and funny figurines of animals or fairy-tale characters, such as gnomes.
The false mill is intended to decorate the area near the house, but some craftsmen build a functional structure. For example, you can make a country toilet in the form of a mill, a small barn or a cellar entrance. Another option is a children's playhouse in the shape of a mill or a booth for a guard dog.

Also, using a simple design, you can hide unsightly elements of the landscape, such as a faucet for watering the garden, a septic tank hatch, or a ventilation pipe from the cellar.
You can make a small decorative mill with virtually no investment if you have some materials left over from construction - timber, plywood, fasteners, varnish and paint.

When choosing a size, it is important to consider the size of the plot, financial capabilities and personal preferences. Large mills look great on large hilly and multi-level areas with a beautifully designed landscape. Small structures look good on a hill.
If you make a larger false mill, you can organize a dining room, gazebo or summer kitchen inside it. But this idea can only be realized on a large-scale site. In a small area, such a large building will look ridiculous.

If you think through the construction of a small mill, then it can also be useful. For example, by equipping it with drawers, you can plant flower beds with different varieties of plants in them. Are you planning to build a pond? In this case, make a mill on it, which can also serve as a place to store pond care equipment, as well as fishing rods.

Essentially, a false mill can be made from any material that you have in your garden. Modern technologies make it possible to decorate any building material. Even broken brick is suitable for the construction of this small-sized structure, which, upon completion of the construction process, is simply decorated with decorative stone.
Traditionally, mills are made of wood. It is inexpensive, easy to process and presentable material. Its only drawback is its instability to weather conditions. In view of this, the wooden structure will need to be regularly painted and hidden in a barn for the winter, which means making a mobile mill. This article will discuss two technologies for manufacturing a false mill: from wood and stone.

So, before you make a classic wooden decorative mill, you need to purchase:
- Wooden beam with a cross section of 20×20 mm.
- Wooden slats for making blades.
- Self-tapping screws for wood, 25 mm long.
- Paint (color depends only on your preferences).
- Moisture-resistant plywood that will cover the frame.
- Electric jigsaw.
- Screwdriver.
- Tassels.
- Bits for tightening self-tapping screws.
- Roulette and level.

To build a stone mill, you will need:
- Brick or other block material from which the false mill will be formed.
- Sand and cement for mixing mortar.
- Cut natural stone or tiles for cladding.
- Sheet iron/plastic for making wind blades.
Tools you will need:
- Putty knife.
- Master OK.
- Mixer for mixing the solution.
- Bucket and shovel.
- Grinder for trimming facing material and cutting out blades.
- Roulette and level.

It’s worth noting right away that building a decorative mill is much easier than its wooden counterpart. To assemble the latter, you will most likely have to use drawings. The entire construction process consists of several stages.
It would be unwise to build a stone structure without a foundation, because in this case it would soon simply collapse. So, you need to cast a shallow foundation in the soil, approximately 40x40 cm. The depth of the foundation is 1-2 spade bayonets.
First, dig a hole, place reinforcement in it and fill it with concrete. Then the foundation must dry, this will take several days.
Construction of a house
The dimensions, proportions and shape of the house depend entirely on your imagination and wishes. The main thing is that the size of the foundation matches the base of the mill. The structure must be level relative to the level. The dressing of pebbles should be as close to the actual size as possible.
In the upper part of the house you need to embed a threaded rod, onto which the blades will subsequently be installed. Weld a plate onto the stud to secure it to the masonry.
You can install the stud after the construction process is completed, but in this case you will have to drill a hole for it in the house. And these events can lead to disruption of the masonry.

To make the structure look as realistic as possible, you need to cut the tiles in the shape of the bricks. In this case, the tiles are laid in the usual way.
When laying tiles, it is important that no voids form in the adhesive.
As for the choice of glue, it is better to purchase a frost-resistant composition. This could be Cerezit CM 17 and CM 117.
Making a propeller

To make a propeller, you need to cut a circle from plywood, in which a hole is made equal to the diameter of the pin. Then attach pre-prepared blades from the slats to this disk. Place them on the stud and tighten them with nuts and washers on both sides.
Before installation, a propeller made of wooden slats should be treated with special impregnations and antiseptics, and then painted.

A wooden mill consists of 4 main components:
- lightweight foundation;
- support platform;
- frame;
- blades.
To begin with, it is important to think through the foundation of the structure. Then you can start making the remaining elements of the mill, which need to be made separately and then connected.
Foundation. Is it necessary

The simplest option is a metal strip poured into concrete underground to the depth of two shovel bayonets. Subsequently, a decorative structure will be installed on this plank.
A mill installed on such a base cannot be stolen. But if there are no reasons to worry about safety, then wooden legs with plastic tips can serve as the base. That is, there is no need to fill the foundation at all.
PVC pipes of the appropriate diameter can serve as the ends of the mill on legs. Fastening plastic and wood is as easy as shelling pears - use self-tapping screws for this.
Support platform

Initially, the lower part of the mill is manufactured - the platform. It must be sufficiently stable to withstand the load of the entire structure.
The higher the mill, the wider its base should be.
For these purposes, you can use boards that are 15 cm wide and 20 mm thick. It is best to use lining as a material for the platform. If we are talking about building a gazebo in the shape of a mill, then you should pour a lightweight version of a strip, columnar or monolithic foundation.
Let's look at the manufacture of a wooden mill using the example of a structure decorating a garden up to 2 m high. To build it, you will need a platform measuring 60x60 cm. It is important that it does not warp during the manufacturing process.
The finished platform can be laid on a pre-prepared foundation, special legs or a sand cushion covered with roofing felt. Be that as it may, before installing the mill platform, treat it with antiseptics to prevent rotting of the material. In addition, it should be coated with weather-resistant paint or varnish.
Drill small holes in the platform so that when it rains, water does not linger on it.

To make the mill body, you need to take 4 beams with a section of 40x40 mm and 4 beams with a section of 25x25 mm. First, you should assemble a pyramid from thicker beams, fastening them with self-tapping screws. The same needs to be done with thin elements. So, you will get the body of the mill. It must be strictly vertical, which can be checked using a building level.

No structure is complete without a roof. The decorative mill is no exception. For it you need to make a gable roof, consisting of two parts in the shape of an isosceles triangle. The size of the slopes is 30x30 cm, and the base is 35 cm.
Slopes can be made from chipboard or plywood. The size of the sides may not correspond to the above parameters, the main thing is that the roof is harmoniously combined with the frame.
The slopes should be connected with slats on the sides and top. As a result, you should get a voluminous triangle. Now is the time to secure the roof to the frame, screwing the slats with self-tapping screws.
The next step is to make a hole in the front slope of the roof. Then assemble the blades. To do this, lay out 2 slats crosswise. Make a through hole in the center of the cross; it should be equal to the diameter of the hole in the roof.
Pass the bolt through the cross hole and the hole in the roof. Then secure it with washers on both sides.
Now take the prepared blade slats and small nails and carefully nail them onto 4 sides of the blades installed on the roof.
The shape of the blades can be arbitrary. Traditionally, trapezoidal and rectangular shapes are used.
Cover the sides of the roof with clapboard. This can be done vertically and horizontally. There is no fundamental difference, it all depends on your preferences. You can sheathe the sides of the roof with more durable material, for example, galvanized sheets.

After fixing the frame, trim the walls with clapboard vertically. To make the mill more interesting, make it have windows, a door and a small balcony in which you can plant flowers.
To carry out decorative finishing, you should use paint, tinted/transparent varnishes, etc. To preserve the natural structure of the wood, the surface can be opened with clear varnish.

It is best to use a weather-resistant alkyd-based varnish. This can be PF-170 or Yacht Varnish.
In order to make the wood darker, thus imitating noble species, you can use stain. In this simple way, from affordable pine you can get a mill for cherry, walnut, ash or oak. With each layer the surface will look darker.

To improve the aesthetic characteristics of the mill, attach platbands or regular moldings to it. By painting them in a color contrasting with the base, you will make the structure more impressive. The dark brown body with yellow moldings combines very nicely.
Another option for decorating a mill is to install lighting. For example, you can place LED lights inside to provide additional lighting in the evening. The lighting looks most harmonious in decorative mills with small windows. No windows? No problem. Install LED lighting around the perimeter of the roof.
Do you want to advantageously mark the mill in the area near your house? Then make a flower garden around it. To prevent the structure from getting lost in the thicket of plants, plant only creeping ground cover crops.

Whatever type of mill you choose, whether wooden or stone, if you follow the instructions in the article, you will really be able to beautifully decorate the area around your house. Do you have any questions on the topic? In this case, write comments on the article.
Video
You can see how to make a decorative wooden mill in practice using knowledge in the video:
Photo
The photo gallery provides various ideas for implementation that will help you decide on the type and features of this decorative element of the garden:


![]()


Blueprints
The drawings below will help you decide on the size and functionality of the decorative mill:


Landscaping a personal plot includes not only flower beds, vegetable gardens, greenhouses and paths, but also many other elements, including those that serve a purely decorative function. An example of such an object is a small copy of a garden mill. Many of its varieties today can be purchased in stores or from individual craftsmen. But often the price for such decorative objects is too high, and if you know how to work with wood, then it makes sense to try to make a windmill with your own hands for the garden. And this article will help you.


The main function of such a structure is, of course, decorative - a mill on the site pleases the eye and creates an atmosphere of comfort. It is also used to decorate gardens and flower beds in the Old Russian or European style (depending on the appearance of the object itself). A good addition to the mill would be benches, miniature carts, fences, fences or a small pond.
In addition, it can bring you practical benefits. With the help of a small mill, some gardeners “hide” not so attractive elements of communications - taps, hatches, containers, etc. As a result, everything that the eye can catch on in the poor sense of the word is hidden, the harmony between trees, flowers, stones and decorative objects do not disturb anything. In addition, the gardener has the opportunity to combine the flowerbed and the mill into one structure - you just need to supplement the base with boxes of soil.

And if you increase the structure in size, it can be turned into a gazebo or children's playhouse. Or, if functionality is more important, turn the mill into a shed and a place to store garden tools.

 Garden mill gazebo

Construction of a garden mill
Most of these decorative objects consist of the following parts:
- platform;
- base;
- frame;
- roof;
- rotation mechanism;
- blades.
Platform- This is the place where the garden mill will be installed. The structure can, of course, simply be placed on the ground in the garden or on a flower bed, but then it will not last long - dampness will do its job and render the decorative object unusable. Therefore, it is advisable to build a platform of concrete or stone. The last option will be more beautiful.


Base– the lower part of the mill itself, usually wider for better stability. The most stringent requirements must be met for the quality of base treatment - this part of the structure is in most contact with wet soil and plants.
Frame– the main part of the decorative object, the wall of the mill. It is assembled from boards, plywood, slats, lining, small logs and many other materials. In addition, the frame has a decorative function and is often decorated with windows, doors, balconies and other small elements.

Important! When choosing a location for a mill, pay attention to the surrounding environment - the appearance of the structure should be harmoniously combined with everything around it.
Roof - the upper part of the structure. Usually assembled from slats, planks or lining. In some cases, plastic is used, especially for rounded roofs, which are difficult to make from wood. By its color, this part of the mill should stand out from the frame.
Inside the roof is located rotation mechanism– axle on two ball bearings. In most cases, it passes through the entire structure; this arrangement is reliable and stable. The mechanism can be supplemented by connecting the mill roof to the frame on a vertical axis and adding a sail - then the structure will not only rotate the blades, but also turn in the direction of the wind.
![]()

Blades, also known as wings - the second most important decorative element of the mill. It is assembled from plywood, planks and thin bars. The main condition is that all blades must have the same mass and be balanced, then the mill will last a long time and without problems. Examples of various design options for mill wings are shown in the pictures below.


![]()
Table. Types of decorative mills for the garden.
| View | Description |
|---|---|
| Quite a simple design. The walls are quadrangular, straight or inclined. Typically, such a mill is completed with a gable roof, but other designs are also found. An excellent option for those gardeners who do not have much experience working with wood. |
| More complex design. Requires fairly high precision in cutting parts of the required size and giving them bevels. Often the walls of such a hexagonal mill taper towards the top. It ends with a dome or polygonal roof. Compared to the previous option, all other properties being equal, it is more attractive. |
| The decorative windmill has the simplest design due to the absence of cladding and a complex roof. In addition to decoration, it helps to determine the direction and strength of the wind on the site. In addition to wood, a windmill can be made from steel profiles, if it is easier and more convenient for you to work with them. |


There are many ways to ensure that a tree on your site dries out quickly. However, the most common of them are those that involve the use of chemicals. preparations intended to destroy plants. Read more in .
Decorative mill for the garden made of plywood - instructions for creating
We present step-by-step instructions for creating a hexagonal decorative windmill for the garden, made of plywood. With the proper skills and the availability of woodworking tools, assembly will not take much of your time and effort.
Important! All parts of decorative mills require careful and multi-layer treatment with antiseptics, protective compounds and varnishes. This is the only way they will not lose their attractive appearance over time and will be able to decorate the site or yard for many years. An example of a good protective coating for a mill is ship or yacht varnish.

Start working with the middle part of the structure, called the frame in the picture above. It is a truncated hexagonal pyramid with a straight base. All parts are assembled from thick plywood.
Step 1. Prepare drawings and part templates. Given the complexity of the design, the dimensional accuracy of each element becomes very important.
Step 2. Using a pencil, mark on the sheets of plywood the individual elements of the frame - trapezoids elongated in height. Then cut them out with an electric jigsaw. Don't forget to cut the side ends at an angle of 45° to connect with the rest of the elements.


Step 3. Place the finished plywood pieces together so that the cuts form grooves facing down. Refer to the image below. Connect the parts together using tape.

Step 4. Turn the resulting structure over and apply glue into the grooves formed by the cuts. Act quickly, but at the same time carefully.

Step 5. Fold all the frame parts into a hexagon so that the glued ends fit tightly to each other. Use the tape again so that the structure holds its shape for a while.

Step 6. Wait until the applied glue dries, lay the walls on their sides and remove any excess. Remove the tape from the structure.

Step 7 Cut out a hexagonal cover according to the internal dimensions of the upper narrow part of the frame. Do not screw in the screw completely on one side - it will act as a kind of handle for installation. Apply glue to the edge of the upper narrow part of the frame, turn it this side down and, using a screw, mount the hexagonal cover. Place some weight on top of it. Wait until the glue dries and remove any remaining residue.


The truncated pyramid that makes up the walls of the mill is ready. Now start creating the base. It is a straight hexagonal prism. To connect to the base of the structure, a central vertical beam is used, which is secured with a screw on the top cover of the prism and passes through the corresponding hole in the bottom.
Step 1. Cut out two hexagonal covers to the size of the base of the previously made truncated pyramid. In the center of one of the parts, make a mark for a screw, in the other - a square hole along the cross-section of the beam.

Step 2. Place both covers on one of the faces, cut out the vertical walls of the prism. Connect the first three of them to the lids with glue; use tape and clamps to maintain the shape. Everything is shown in the image below.

Step 3. Repeat the previous operation with the three remaining faces of the prism.
Step 4. Insert the beam into the hole in the bottom cover. Move it until it touches the top hexagon. There, screw in the screw according to the mark and secure the beam.
 The beam must be screwed to the upper hexagon
Step 5. Treat the lower walls of the truncated pyramid and the top of the prism with glue and connect them to each other. Use tape again to maintain the shape.

Step 6. Once the glue has dried, remove the adhesive tapes and sand the resulting structure with a sander or sandpaper.

The next part of the mill to be made is the base, which consists of three parts:
- the lower part is a large straight hexagonal prism with fastening for a vertical beam;
- the middle one is a truncated hexagonal pyramid;
- the upper one is a small straight hexagonal prism with grooves for a decorative viewing platform.
As with the walls of the mill, we present the manufacture in the form of step-by-step instructions.
Step 1. Prepare the fasteners for the timber mentioned above. It consists of a board mounted on a lower hexagonal prism and a hollow box for the cross-section of a beam.

Step 2. Cut out six parts for the lower prism from plywood, make cuts in them at the side ends, as shown in the instructions about the walls of the mill. Connect with glue and tape together. Then secure the board and box for fastening the timber from the previous step. Make sure that they are positioned exactly according to the drawing.
 Finished bottom prism of the base with fasteners for timber
Step 3. Now proceed to the truncated base pyramid. Cut out trapezoidal-shaped parts from plywood, and use a jigsaw to make cuts on the side ends at an angle of 45°. Then connect the elements of the pyramid from the outside with tape, glue the grooves and assemble a hexagonal structure. After drying, get rid of any remaining glue.

Step 4. Make a small upper base prism. Cut small grooves at the corners to attach an observation platform that will decorate your mill.

Step 5. Connect all three parts of the base to each other using glue. Place a weight on top of them, which can be a bucket of water. The weight is necessary for better adhesion of the glue.

Important! Do not overdo it with the weight of the load; the base structure may not withstand excess loads.
After completing the bottom of the mill, proceed to the observation deck. The latter consists of supports made of small bars, a path of slats and railings. The platform is screwed to the bottom of the mill wall and installed with supports in the grooves of the base.
Step 1. Cut out the base bars. Then make marks or small holes on them for attaching the viewing platform to the walls of the mill with screws.


Step 2. Prepare a template according to which the observation deck floor slats will be laid. It should be a hexagon with marks made in pencil. It makes sense to glue it with double-sided tape so that the floor slats do not move due to the slightest movement or contact with the supports during installation.

Step 3. Lay five rows of timber as shown in the photo below to form the floor of the observation deck. They are connected to each other using a small amount of glue. From above, with its help, secure the supports to each of the corners of the hexagon. Use clamps to clamp.

Step 4. Wait for the glue to dry and carefully separate the floor and viewing platform supports from the template.

Step 5. Attach vertical bars to the outer edges of the supports - these will be the railing posts. Fastening is done with screws.

Step 6. Carefully glue the slats that will form the walls of the railing to the posts. Use clamps or plastic clamps to form.


Step 7 Turn the mill frame over and place it on the floor or work area with the beam facing up. Also flip the viewing platform over and secure it to the bottom hexagonal cover of the frustum with screws. Then glue the grooves in the upper part of the base with glue and attach the frame of the mill to it along with the viewing platform.

The creation of a decorative windmill for the garden is nearing completion. The next stage is the dome and the inner part of the “wings” rotation mechanism. The roof of the mill is made of a plastic hemisphere, to the bottom of which a plywood ring is attached. It, in turn, is connected with screws to a circle that is mounted on the top cover of the structure frame.
Step 1. Process the dome, cut out a ring and a circle from plywood of the required size.
 The dome, as well as the circle and ring, cut from plywood
Step 2. Make holes or marks for them in the same places in the circle and ring - this will be needed for subsequent assembly. Mount the circle on the top cover of the mill frame.

Step 3. Make fasteners for the bearings of the mill wing rotation mechanism. They are wooden blocks with holes of the appropriate diameter. Their structure and creation are shown in more detail in the images below.

Important! For many works on assembling a garden decorative mill, your indispensable assistant will be a stand for vertical mounting of a drill, which thus turns into a drilling machine.


Step 4. Connect the lower halves of the bearing fasteners by inserting horizontal bars between them and at the ends, as shown below.

Step 5. Install bearings into the holes of the fasteners, mount the entire structure with screws, add a small support in the front to provide some tilt.

Step 6. Now you need to connect the bearings to the stainless steel axle. To do this, use nuts and washers, screwed on all sides of both fastening bars.

Step 7 Install the bars with bearings and axle on the circle previously mounted on the mill frame.

Step 8 Determine the point where you need to make a hole in the plastic dome for the axle.

Step 9 Drill a hole in the dome for the axle. Then glue a plywood ring to the bottom side. Use tape as a clamp (crosswise).

Step 10 Carefully mount the dome on a circle of plywood, threading the axle through the hole. Use screws as fasteners, turning them into the marks or small holes made in step 2.


After this, it is necessary to manufacture the outer part of the mill mechanism - the blades and their attachment to the axis.
Step 1. Cut out a block to secure the mill to the axis. Its manufacture is shown in detail below.


Step 2. Using a pre-made template, cut out four blades from relatively thin sheets of plywood.


Step 3. Prepare four long bars. With their help, the mill blades will be attached to the central block and axle.

Step 4. From one of the ends in each of the bars, drill a hole for a pin.

Step 5. Glue the bars to the blades. Be especially careful and respect the dimensions.

Step 6. Prepare the pins with clamps, attach them on one side with glue to the bars with blades.


Step 7 Insert the clamps into the corresponding holes in the central block, then insert the blades with studs from the ends. Fasten everything accurately and carefully.

Step 8 Install the central block and blades onto the mill axis. Check if the mechanism works. If everything is in order, the decorative structure is ready! All that remains is to paint it, varnish it and put it in the garden or flowerbed.

Advice! If you think that the design of the decorative mill outlined above is too complex, then it makes sense to try to create a more simplified version - with four walls and a frame made of ordinary boards or lining.

Prices for plywood sheets
plywood sheets
Video – Decorative mill
DIY log mill - instructions
Its design is a smaller copy of real log houses. Shovel cuttings can be used as “logs” - they are cheap and available at any hardware or gardening store. The list of necessary tools is the same as in the instructions for the previous mill, only a ring attachment for the drill is added to them, which is necessary for cutting out rounded grooves for the frame.
Step 1. Prepare the cuttings, remove their packaging, if any. Place the two cuttings together and secure with clamps and screws. The parts of the workpieces extending beyond one of them should be slightly larger than the length of the walls of the future mill. Mark the places for cutting out the cups (as the grooves in the log house are called). This instruction describes the creation of a mill with hexagonal walls, because the connection of individual elements of the log house is not at right angles. Therefore, the cups in the cuttings should be “oblique”, at an angle of 60°. To do this, prepare a wedge as in the image below.
Step 2. Place two cuttings connected together and clamped on the inclined surface of the wedge and secure. Using a hole saw attached to an electric drill, cut the cups for the frame in one operation in both blanks, as shown in the image below. Then turn the cuttings with clamps 180° and make two more grooves, but from the other edge of the cuttings. After this, use a jigsaw to cut off what is located behind the edge of the clamp. The logs for the base of the log mill are ready.
Step 3. Move the clamp higher along the cuttings, again mark the points for drilling the cups and repeat the previous operations until the required number of logs is ready.
Step 4. Carefully cut six similar logs lengthwise into two halves - one with cups, the other without. The first will go to the top of the mill base, the second to the bottom.
Step 5. In this case, the logs are connected to each other by pins inserted into the base, so drill a hole of the required diameter in the middle of the cups in each of them. An alternative joining method is wood glue.
Step 6. Prepare a hexagonal base. Assemble it from two glued trapezoidal boards or cut it from a single piece of plywood. Insert the studs into the corners of the future log house.
Step 7 Place the first three elements of the frame on the studs - halves of logs without cups, prepared in step 5.
 6 – Sawing holes for pins in logs; 7 – Beginning of the formation of the log house; 8 – Finished “log” walls of the mill base
Step 8 Sequentially place logs on the studs, forming a log house, as in the image below. You can cut holes inside for decorative doors or windows.
Step 9 Treat the hexagonal base and walls of the frame with stain or varnish to give it a more attractive appearance and protect it from damage. Attach another hexagon to the studs on top, made in the same way as the product from step 6. In turn, fix the metal corners on it.
Important! For durability, equip the base of the mill with legs or supports made of wood varieties that are resistant to external influences. It could be oak or larch.
Step 10 Attach long and thin bars to the corners, which will act as a frame for the walls of the mill. At the top they are attached to a hexagonal plate of slightly smaller board or plywood to create a slight slope.
Step 11 Cover the frame of the mill with small slats, which are then treated with varnish or stain. At the same time, to improve the appearance, cut holes in the walls for decorative windows and doors. Then make a rectangular base for the roof, assemble its frame from the same bars and cover the ends with slats and the roof with glazing beads. Cover the fastening points here and on the walls of the mill with decorative strips.
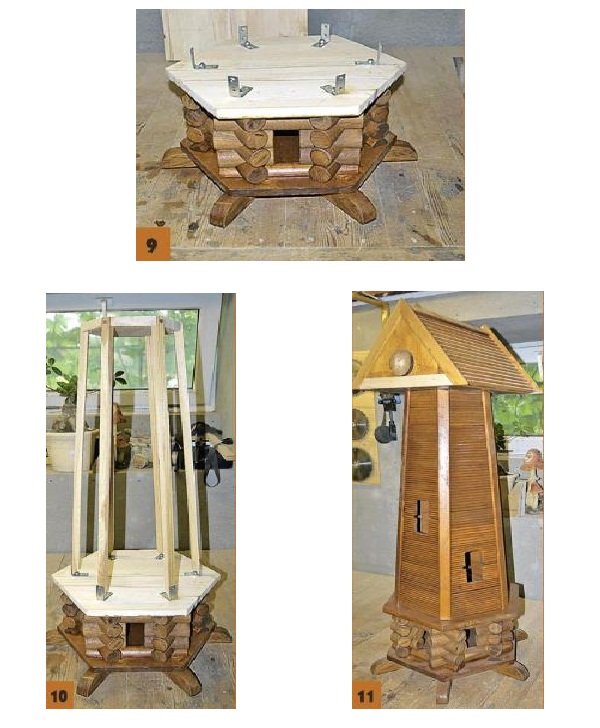 9 – Treated base with corners for fastening the wall frame; 10 – Installation of frame bars and upper hexagonal plate; 11 – Finished walls and roof of the mill, covered with slats and decorative strips
Step 12 Prepare holes for the axle at the ends of the roof. It can be made of metal or wood. At the outer end of the axle, attach an octagonal block, on which four holes are made at equal intervals for fastening the blades.
Step 13 Cut out three bars that will play the role of a “frame” of the blades - two side ones, located at an angle, and one central one. At the end of the latter, make a rounded pin for mounting the blade on the axle. Then nail the “frame” bars onto the slats and cut them into the desired shape, as in the image below.
 12 – Axle with an octagon, necessary for fastening the blades. The ends are covered with cuttings; 13 – Preparation of the blade. Three bars are its frame, the slats just have to be cut to achieve the desired shape
Step 14 Process the blades and secure them to the axle. If necessary, balance them so that the mass is approximately the same and the mill is not subjected to unnecessary stress. Install it in the right place in the garden, preferably on a support made of stones - this way the structure will last longer.

With the right attitude and some skill in working with wood, you can easily get an excellent mill that will decorate your garden, yard or flower beds for many years.
Wood stain prices
wood stain
49488 5Have we answered your question?


