How to build a gazebo with your own hands projects. DIY wooden gazebo: step by step, with photos, videos, dimensions, drawings. Railings and OSB cladding
Almost all owners of dachas or private houses set up a wooden gazebo in their yard, where they can sit and relax in the summer. If you make a permanent gazebo of medium size, then you can actually install a barbecue inside it. Then here you can not just relax, but organize any celebration with your family or friends. If it is also closed on all sides, then you can spend time here in winter, especially since the grill will serve as an additional source of heat.
The decision on which gazebo is best to build is made by the owner of a summer house or private house based on his financial capabilities. In this regard, most often you can see fairly simple designs made by yourself.
The article is aimed at helping owners of summer cottages and private farms build some kind of gazebo, depending on the available capabilities.

There are summer, open-type gazebos and closed, all-season gazebos. In addition, there are combined options when the gazebo is opened in the summer, and with the arrival of cold weather it is insulated. But these are intermediate options that deserve attention. As a rule, such options are somewhat cheaper than completely closed ones, but they take away some of the precious time for manipulation.
Gazebos with and without floors
There are gazebos with a floor, as well as gazebos mounted on an open area or area where a concrete screed is made or paving slabs are laid. If you just build a gazebo on the ground, especially a wooden one, then you need to take measures to protect wooden structures, especially in places that are in contact with the ground. If the gazebo is made of metal, you will have to protect it from rust.
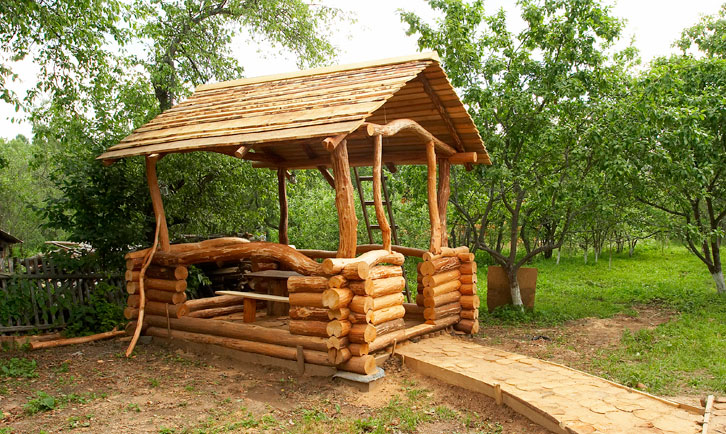
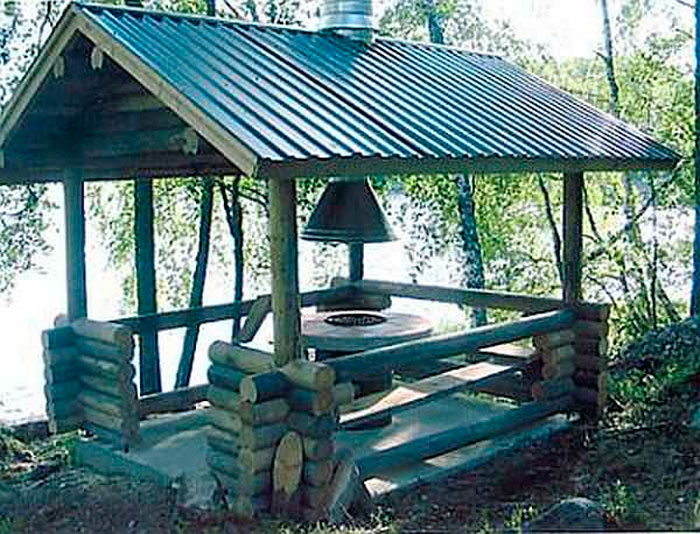
 A wooden gazebo without a floor, made of wood. It has one feature: the roof is quadrangular, and the gazebo itself has beveled corners.
 Building a gazebo with a floor involves installing a foundation. Basically, they are limited to a columnar foundation, which is made of brick or rubble, poured with concrete, or mounted on foundation blocks. Alternatively, you can use large stones (boulders) and support the entire structure on them, if available. This foundation is suitable for light frame buildings made of wood or metal. If the building is capital, made of brick, then it is unlikely to be limited to a columnar foundation: you will have to pour a concrete strip foundation, albeit in a simplified version. It is enough to deepen the foundation by 20-30 cm.
 A gazebo made of wood, but with a wooden floor, mounted on supports.
 To lay tiles in the gazebo, you will have to pour the floor with concrete, but first insulate the floor with foam plastic, for example, and also lay a layer of waterproofing. After this, you can lay tiles, and frost-resistant floor tiles. At the same time, you should make sure that the floor extends 50 centimeters beyond the gazebo and these 50 cm should be laid out at a slope so that moisture does not remain on the tiles. If the gazebo is not closed, then all the tiles should have a slope. If moisture does not linger on the tiles, the tiles will last quite a long time.
Materials used
The following materials are suitable for frame buildings of this type:
- A wooden beam or round timber of small diameter.
- Steel profile pipes.
- PVC pipes.
Of these three materials, only the last does not require additional protection. Polymer materials do not rot and are not afraid of both high and low temperatures. Therefore, such structures can withstand winter quite easily. The only thing that is accompanied by a certain complexity is the selection of PVC pipes for making the frame, since they do not have such high strength as wooden beams or metal pipes. In this case, you will have to decide on the design of the gazebo so that the installed furniture does not load the PVC structure, and the barbecue will have to be installed away from PVC pipes.
 PVC pipes can serve not only as a frame, but also act as a decorative finish.
 In order for a wooden gazebo to delight others with its appearance for a long time, you will have to treat the wood with a protective compound more than once.
As an option, you can use impregnations such as SENEZH or ESTATE. Reviews about these protective compounds are not bad. In addition, this manufacturer supplies the market with coloring compounds.
If the frame of the gazebo is made of metal, it should also be protected from atmospheric influences. To begin with, the pipes are primed, and then the welding areas are treated with a primer. Although this option is not optimal: it is not at all difficult to coat an already welded structure with a primer. If rust is found on metal elements, it is better to clean it off with sandpaper. This approach will allow you to maintain the acceptable appearance of the gazebo frame for a long time, which means that it will last a long time.
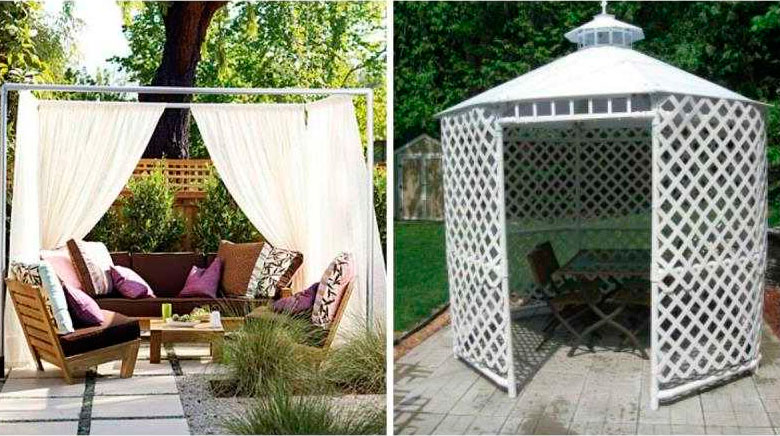
 Gazebo made of plastic. Nothing to do with the environment, but there is no need for additional treatment against fungi or rust.
 You can cover the gazebo with any material, but wood is considered the most popular: after all, it is a natural material. The materials used for cladding are processed boards, blockhouses, clapboards (wooden), thin round timber, as well as pallets, which are disassembled, the boards are processed (sanded) and the lower part of the gazebo is sewn up. It takes a lot of time, but it's very economical. In addition, such wood is quite dry and after additional protection can last a long time.
Gazebos of any design can be sheathed with the following materials:
- Polycarbonate, but this will be quite expensive.
- Corrugated sheeting, somewhat cheaper, but not very comfortable.
- Tempered glass is, well, very expensive.
- Ordinary fabric, which is very economical, but not very modern.
- Transparent PVC film.
- Bamboo, expensive, but stylish.
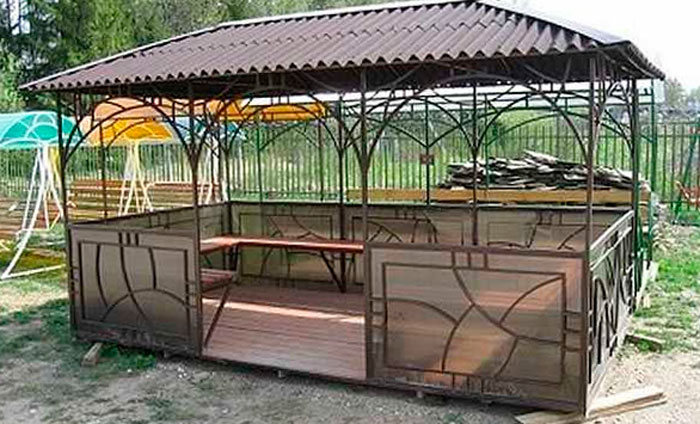 A gazebo made of metal combined with translucent polycarbonate cladding.
Frameless gazebo options
Frameless gazebos are permanent buildings on a strip foundation, laid out of brick or foam block, lined on the outside with decorative tiles or artificial stone. Moreover, building options can have all the walls up to the ceiling, or several main walls (for example, two), while the rest of the gap(s) remains open. Such designs require large capital investments. To build them, it is better to hire craftsmen or seek help from a construction company. If you do it yourself, the construction of the gazebo may take an indefinite period of time.
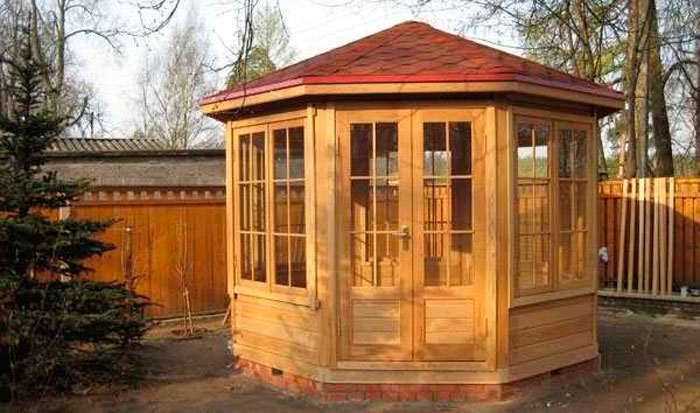
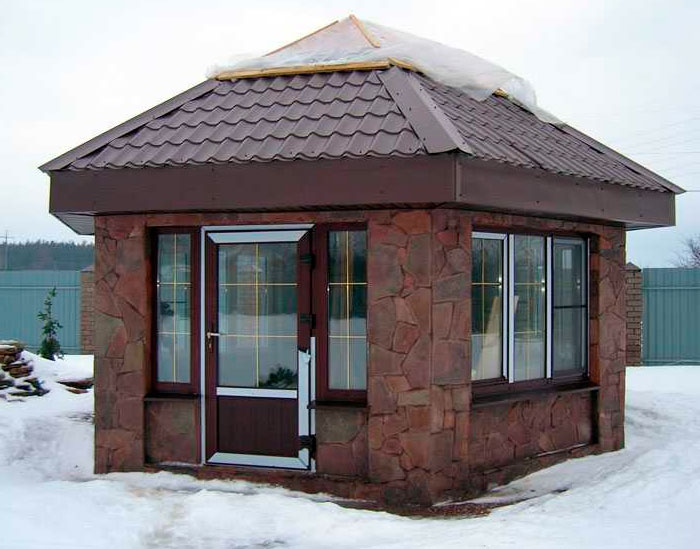 A capital gazebo, trimmed with wild stone, in combination with glazing. Both brick and other modern materials can be used as the main building material.
 If you plan to build a gazebo made of brick, then it is better to hire good masons to lay out the frame of the gazebo with high quality. Then, you may not have to spend additional money on finishing the outside of the building. Building a gazebo from foam blocks will require exterior finishing. There are many finishing options. In this case, you will first have to level the walls and only then start finishing. Since capital buildings are intended for use in winter, they must be warm. Alternatively, you can build a wooden frame on the outside, insulate it with ursa and cover it with siding.
Roof structure
The design of the roof depends entirely on how complex the shape of the gazebo is. If the gazebo is rectangular, then the roof design will be quite simple: a single-slope, gable or hipped version. Such forms of gazebos are also considered one of the simplest, requiring a minimum of time and money. The process of constructing a single-pitch, gable or hip-pitch roof is almost the same in technical terms.
 A rectangular gazebo made of round wood, equipped with a gable roof.
 With more complex forms of gazebos, the process of building a roof becomes more complicated. If the gazebo is pentagonal, hexagonal or octagonal, then the most suitable roof option is a tent-shaped roof (tent roof). In technical terms, these are the most complex structures, since you have to think about how to connect all the rafters at one central point.
 A dome-shaped roof is technically difficult to implement. If you have no experience working with wood, it is better to refuse this option.
 The availability of modern building materials, including roofing, makes it possible to make the roof completely round, without edges. In this case, you need to be able to work with metal pipes and welding. The pipes are bent according to a certain pattern and the sheathing is attached to them. It is desirable that the sheathing be continuous. Flexible roofing material is installed on top of the sheathing.
 The simplest version of a garden gazebo: two curved pipes to which polycarbonate is attached.
 Simple designs of gazebos, especially recently, are very popular. Some summer residents set up gazebos under the same roof as their house. They are usually called verandas. In fact, this is also a simple and affordable option, with a minimum of costs.
There are a huge variety of gazebo designs, so it’s simply unrealistic to talk about them all. Moreover, each of them is the result of hard work and broad imagination.
How to make a gazebo with your own hands
It just so happens that most often they build gazebos with their own hands from wood. This is due to the fact that working with wood does not require special tools. The second place is occupied by metal gazebos, but their construction requires skills in working with metal. It is very rare to see gazebos made from other materials. This is associated with some difficulties, as well as increased costs, which the family budget cannot support.
If a gazebo is built from wood, first of all it will have to be treated with preparations that protect the wood from bacteria and fire. Work can begin after the impregnation has completely dried. Firstly, this is necessary for quality, and secondly, it is problematic (inconvenient) to work with wood that has not yet dried.
Availability of drawing
The presence of a drawing with dimensions significantly simplifies the process of building any structure, and a garden gazebo is no exception, despite its small size. Without a drawing, it is very easy to get confused in the parts being manufactured, although there are not many of them at all.
The figure below shows two options for gazebos: one with a gable roof, and the other with a 4-pitched roof, although both gazebos are 4-corner.

Step-by-step instructions with the presented photo
All work begins with preparing the site for the gazebo. As a rule, a certain ball of soil is removed along with the fertile layer. This is necessary so that in the future this organic matter does not rot under the floor of the gazebo. If the soil is sandy or sandy loam, then construction waste, crushed stone, broken brick, etc. are poured into the dug pit, after which everything is thoroughly compacted. After this, a layer of sand is poured on top. If the soil is clayey and there are problems with water drainage, then it is better to pour a layer of clay into the pit and compact it. If the hole is filled with something else, then moisture will accumulate in it. Under the influence of heat, the water will begin to emit an unpleasant odor, which is not at all necessary.
Arrangement of the foundation and lower trim
The easiest way is to install concrete blocks on the prepared cushion so as not to delay the construction of the gazebo. If you lay out brick columns, it will take a lot of time (not only work is taken into account here, but also the time to strengthen them). The distance between blocks is selected from 1.5 to 2 meters. If the gazebo is built from wooden beams 100x100 mm, then the distance is chosen to be 1.5 meters, and if from a profile pipe 60x60 mm, then 2 meters is enough.
The supports must be aligned in the same plane. To check this, you will have to use a level and a long, straight rod. After this, waterproofing is laid on top of the columns (2 layers of roofing material or bitumen mastic). And only after this the lower trim bars are mounted. The beams are connected to each other using nails 150 mm long. To strengthen the frame, each connection is duplicated with powerful metal corners. Despite the fact that this is a summer gazebo, extra strength will never hurt, since the structure will quickly become loose under the influence of wind.
 The lower harness is assembled.
 Installation of racks
The next stage is attaching the racks. Racks are provided at the corners of the gazebo, in the center, on both sides of the entrance, and also where the supports (foundation) are installed. The racks on top have the same strapping as on the bottom.
Installation of racks is carried out strictly vertically, with control of this process at the building level. Many argue that building levels have a large error. This may be true, but for the construction of a garden gazebo the error does not matter much. In addition, when purchasing a level, it is advisable to check it. Alternatively, you can use a regular plumb line, but it is very difficult to use alone. One person should use the plumb bob and the other person should attach the posts. Using a building level, you can do without outside help.
Fix the position of the racks with jibs. In the future, having fixed and secured everything thoroughly, the jibs can be removed if they interfere. If the lower part of the gazebo is not transparent, then the jibs can be left. They can simply be permanently and reliably secured using metal corners. At the same time, it is advisable to check the racks for verticality each time.
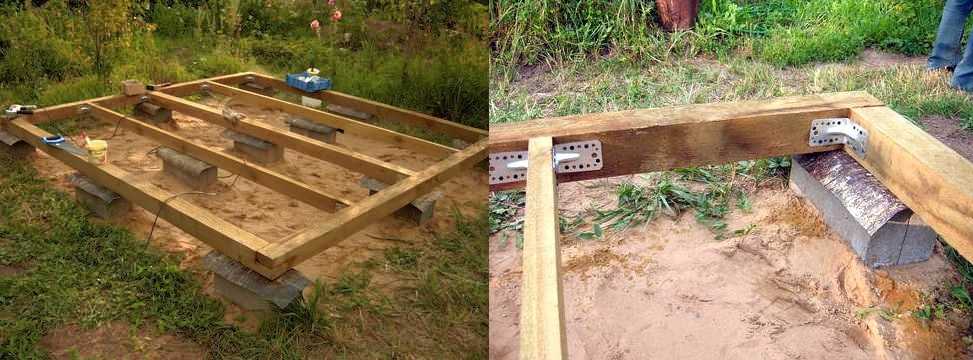
 Two options for attaching racks with bevels. On the left are temporary jibs that are planned to be removed, and on the right are permanent ones that will be used in the future.
 Installation of the top trim and floor boards
After the racks are finally secured, they are also secured from above, installing the upper trim. Technically, it looks the same as when installing the lower trim. For reliability, metal corners should be used. This is especially important if the structure does not have permanent jibs.
After the frame is almost assembled, begin laying the floor boards. They, like all wooden structures, are treated with antibacterial impregnation. For such purposes, Senezh or Senezh-Ultra impregnation is suitable. They differ from each other in that “Ultra” does not color the wood, but gives it a greenish tint. If the entire structure is covered with a dark stain, the greenish tint will disappear and remain unnoticeable.
 Means for impregnating wood that may come into contact with the ground.
 After the boards are secured with nails, it is better to paint the wooden floor, otherwise the wood will become dirty before construction is completed. It is better to paint outdoor wood with varnish or oil-based tinting paints. Moreover, these are not classic oil paints, but special compositions to protect wood from atmospheric precipitation. The basis of these compositions is oil, to which protective elements and color pigments are added. As a result, the wood takes on a completely different shade, while maintaining its texture.
Strapping the structure in the middle of the frame
The middle frame binding, in most cases, is simply necessary, since the frame is divided into an upper and lower part, which is always (almost always) sewn up. It is better to secure the beams that should be installed using metal corners or make recesses for them in the racks, up to 25 mm in size, if the thickness of the beam is 100x100 mm.
 Option for attaching the middle harness.
 After this, you can begin the final painting of the frame of the garden gazebo.
Roof arrangement
The next stage is the assembly of the rafter system, as shown in the photo below. The rafters are similar in appearance to triangles.
 Rafters (triangles) for arranging the roof.
 These elements are attached to the frame of the gazebo. Since there is no roof overhang, they are attached directly to the beam of the top frame. The triangles are installed vertically and secured with nails. To fix them in this position, you can use bevels.
If the structure of the gazebo has an overhang, then it is necessary to cut out seats in the rafters. The attachment points look like triangles.
 Options for correct fastening of rafters.
 Of these two options, the first one is more suitable, since the roof is not large. In order not to adjust each rafter leg individually, it is better to use a template. To do this, you need to take a piece of regular board and cut an opening of the required size. This will not only simplify the task, but also provide the necessary accuracy. To make the work less of a burden, you can use a power tool, for example, a jigsaw.
Before final fastening of the rafters, be sure to check the correctness of their installation, both vertically and horizontally.
After the final and reliable fastening of the triangles, the sheathing is filled. The nature of the lathing depends on the nature of the roofing material. Soft types of roofing materials require continuous sheathing. If it is slate or corrugated sheeting, then regular sheathing will do.
Decorative finishing
After arranging the roof, when the entire structure is closed from rain, they begin finishing the lower part.
 The gazebo with your own hands is ready.
 This design falls into the “simple, fast and cheap” category. Taking it as an example, you can experiment by doing something of your own with your own finishing elements. In the following example you can see how the gazebo, made according to the same design, has changed: the lower part is covered with a blockhouse painted in a light tone. And the rest of the frame has a dark tone.
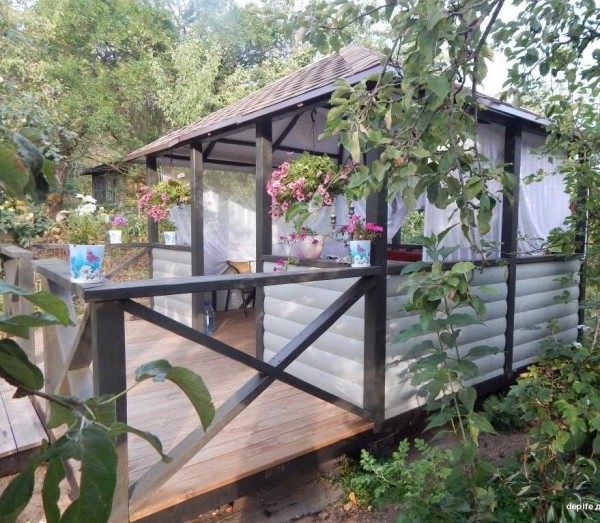 This is another version of the same project.
 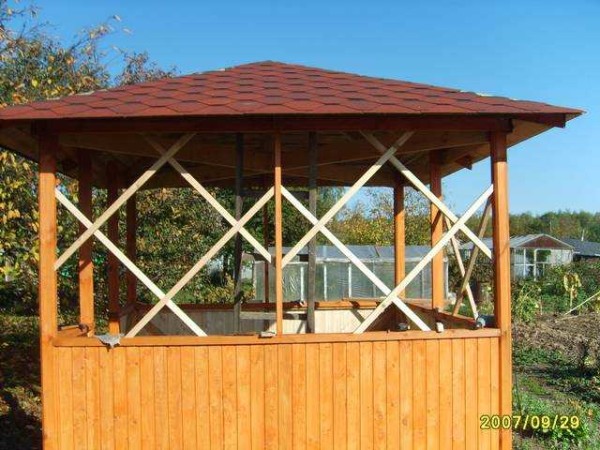 In the next photo, there is another option. Using this project as a basis, you can get many options.
 Below in the article are drawings with all dimensions. Below are interesting photos, but without drawings. There is hope that someone will use them.
Sketches of gazebos with drawings and dimensions
All dimensions indicated on the drawings can be increased or decreased to obtain a structure of the required dimensions. With a significant increase in size, the size of the wooden elements (section) should also be increased for the required strength. If everything is done correctly and in the right sequence, then you can count on a positive result.
Classic wooden gazebo
The project is almost the same, but some dimensions have been changed: the top point of the roof has been raised, making it seem lighter. The gazebo is quadrangular with a hip roof.
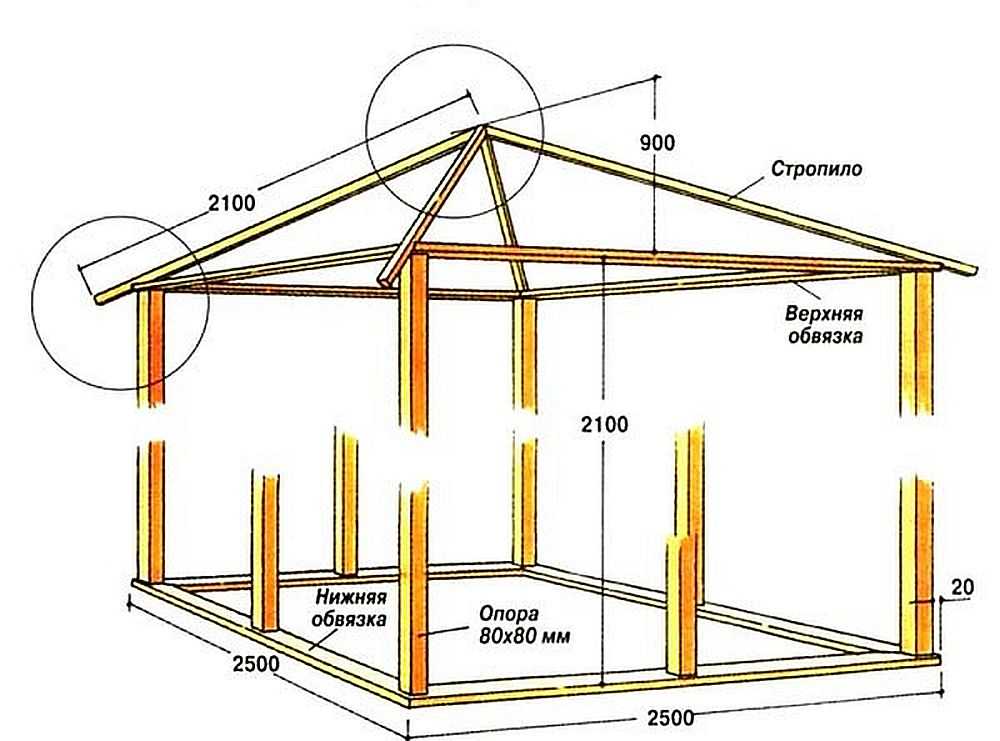 An ordinary square gazebo for a garden or cottage made of wood.
 The roof installation has problematic attachment points, indicated in the figure by circles. The picture below shows how to do this correctly.
 Options for fastening problem units when arranging a hip roof.
 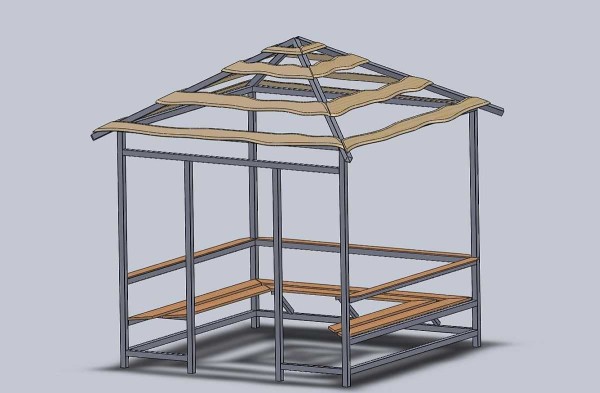 Option for distributing space in height and option for attaching the sheathing to the roof.
 Chinese style gazebo
All dimensions are indicated on the drawing, and the project includes marking for the foundation, installation of the rafter system, etc. The project is arranged in the form of a photo gallery.
To start building a wooden gazebo with your own hands, you need to study the construction process thoroughly. First you need to determine the appropriate dimensions of the building, the type of foundation, the shape of the structure and select materials for the walls and roof. Subsequent steps must be performed in stages: draw up a drawing, pour the foundation, assemble the frame and sheathe it. Without experience, we recommend starting with the construction of small structures and the correct shape, which will greatly facilitate the task. This approach will ensure that you can build a wooden gazebo yourself the first time.
Types of wooden gazebos
Firstly, wooden gazebos are divided into open and closed. The first option is light seasonal buildings, not intended for use in cold weather. Closed gazebos are more permanent structures, with a solid roof, often glazed or with one blank wall. Secondly, they can be made of wood in a square, rectangular, round shape, as well as hexagonal or octagonal.


Any type of foundation is suitable as a base: shallow strip, slab, etc. You can even install a gazebo on a cinder block or logs laid flat. The larger the size of the structure, the stronger the foundation for it should be. Another difference is the material for the walls: it can be wooden beams, slats and boards, as well as solid logs.


So, in order to choose the right type of structure, you first need to decide on the purpose. If a gazebo is needed for a family holiday in the summer, a small open-type option is suitable. As a base, you can use cinder blocks, brick pillars, a columnar foundation made of pipes or logs. If you plan to gather with friends or celebrate family events in a wide circle in the gazebo, you should pay attention to a spacious closed-type structure with a slab or strip base.

It is much easier to build a square or rectangular gazebo than a round or hexagonal one. Using logs and boards to build walls also simplifies the construction process, but figured lattice walls look more elegant. All this should be taken into account when choosing materials and drawing up a drawing. In addition, the elements of the gazebo must be combined with the landscape of the site and the residential building.

Columnar foundation for gazebo
This is the simplest and most cost-effective foundation option. To make it you will need:
Support pillars should be located at the corners of the gazebo and under the load-bearing walls every 2 m. If metal pipes or cuttings of logs are chosen as supports, holes for them are prepared using a hand drill. The diameter of the holes is 10 cm larger than the diameter of the pillar, and its depth is approximately 70 cm. For pillars made of brick or cinder block, holes are dug with a shovel, giving them a square shape. The depth of such pits should not be less than 50 cm.
Sand is poured onto the bottom, and then crushed stone, the thickness of each layer is about 10 cm. Metal pipes are cut into equal parts so that after installation in the pits they rise 15-20 cm above the surface. The metal is treated with an anti-corrosion compound and dried. Lower into the holes and align vertically. A piece of reinforcement is inserted inside each pipe, the length of which is 10 cm longer than the length of the column. Now concrete is poured into the pipes, and the space between the walls of the pit is filled with soil and stones and compacted.
Instead of pipes, you can take dry dense logs. They are treated with an antiseptic, and then coated with bitumen mastic and dried. After this, the supports are lowered into the prepared holes, compacted or filled with concrete mortar.
If blocks or bricks are used as pillars, cover the bottom of the pit with a cushion of sand and crushed stone, drive in a piece of reinforcement 70-80 cm long in the center and fill the pit with concrete mortar to the top. When the concrete has cured, its surface is covered with roofing felt, and a brick or cinder block is laid on top. The reinforcement should be in the center of the column and protrude 10 cm above its surface.
This type of foundation is perfect for a small round or square gazebo. The boundaries of the site are marked, after which soil is selected to a depth of 40-50 cm. The bottom of the pit is leveled and compacted, covered with sand to a height of 10-15 cm, spilled with water and compacted again. Then crushed stone is poured in a layer of 15 cm and a reinforcing mesh of rods connected with wire is laid.
Stepping back 10 cm from the edge, vertical pieces of reinforcement are attached at the corners so that they protrude 15 cm above the foundation. A low piece of plywood is installed around the perimeter, reinforced with spacers, and filled with concrete mortar.
Shallow strip foundation
This option is best suited for a spacious closed gazebo. The boundaries of the foundation are marked on the site, marking them with driven pegs with a rope stretched between them. The width of the tape should be slightly larger than the thickness of the walls, usually 25-30 cm. The depth of the trenches is 50-70 cm, depending on the density of the soil. The bottom of the trench is covered with sand, then gravel or crushed stone, and reinforced with a lattice made of. The formwork is made low, enough so that the foundation rises 10 cm above the ground.
When the foundation is strong and strengthened, you can begin installing the floor coverings. To do this you will need:
- dry timber with a section of 10x10 mm;
- edged board with a thickness of 2 cm;;
- nails;
- hammer;
- drill;
- level;
- jigsaw
If the gazebo is rectangular in shape, installing the floor will not take much time. The timber is treated with an antiseptic, air dried and cut to the width of the gazebo. First, the beams are laid along the perimeter of the foundation, using reinforcement protruding from the concrete for fastening. To do this, holes are drilled in the wood, rods are threaded through them and bent with a hammer.
DIY garden gazebo - drawing
Next, intermediate logs are laid at a distance of 30-40 cm; be sure to check their horizontal position to eliminate the slope of the floor. The logs are fastened together with nails or self-tapping screws. After this, the timber is sheathed entirely with boards pre-treated with a primer. For round and hexagonal gazebos, this method is not suitable; there, the beams are mounted either in the form of rays diverging from the center, or in the form of trapezoidal cells.
A log gazebo does not require a timber frame; construction begins immediately with laying the walls. Roofing felt is laid on the foundation, and the first row of logs is attached on top. The logs should be located along the perimeter, excluding only the doorway. Grooves are cut at the ends of the logs and the corners are fastened. It is advisable to join the logs only at the corners, so the appearance of the gazebo will be more attractive.
Having laid 3-4 rows of logs around the entire perimeter, they move on to the corners of the building. The logs are cut into pieces about half a meter long, grooves are cut out and laid at the joints of the walls. You can make trapezoidal corners by using pieces of varying lengths and reducing them as the walls are built. When the structure reaches the desired height, logs are laid again around the entire perimeter, strengthening the upper crown with metal brackets or spacers. The space between adjacent corners can be closed with a figured wooden lattice, a forged lattice, or left as is. Now all that remains is to mount the roof, and the gazebo will be ready.
Find out how to build, and also consider the nuances of planning and construction, from our new article.
Gazebo made of timber and slats
To build an open frame-type wooden gazebo you will need:
- timber with a section of 80x80 mm;
- slats 20x40 mm;
- plumb line;
- screws and nails;
- hammer;
- screwdriver;
- antiseptic primer.
When installing the floor of the gazebo, the lower beam frame was already laid. Now it is necessary to install vertical supports and sheathe the walls of the building. For vertical supports, dry, even timber 80x80 mm is used. First, the corner posts are mounted, secured with temporary spacers and aligned strictly vertically. The racks are nailed to the bottom trim or secured with metal plates and bolts. Intermediate ones are installed between the corner supports, at a distance of 1-1.25 m from each other.
When all the vertical supports are mounted, they should be secured with the top trim. The same 80x80 mm timber is used as the strapping; it is laid on top of the corner posts, leveled horizontally and nailed down. All elements of the top trim must be in the same horizontal plane. At the end of the installation, the temporary spacers are removed and the walls are sheathed with slats.
The slats can be stuffed horizontally, leaving gaps of 3 to 7 cm between them, made into vertical panels, and mounted diagonally between the posts. But walls made of wooden lattices with diamond-shaped cells look best. To make such gratings, the slats are packed at an angle of 45 degrees. In this case, the grilles should not be solid: it is recommended to leave free space in the form of an arch or a semicircular cutout above the doorway and in each wall.
Prices for various types of timber
Gazebo roof installation
The roof for the gazebo can be made pitched, or in the form of a tent. The simplest option is a shed roof, but the most common is a hipped hip roof. To arrange it, take 4 beams with a cross-section of 80x80 or 100x100 mm, knock them down on the ground so that they form a regular pyramid, and lift them up. It is recommended to use metal plates and bolts to attach the rafters to the top frame. The beams in the center of the roof are also fixed using plates.
To strengthen it, horizontal spacers made of timber of a smaller cross-section are placed between the rafters. If the gazebo is very large and has a rectangular shape, it is better to install a gable roof. To do this, triangular trusses are knocked down from 80x80 cm beams and installed on the top frame. The distance between the trusses is 1 m; they are attached by inserting into horizontal beams and secured with spacers. Along the upper edge of the trusses, they are connected by a ridge beam.


The dacha plot is a great place for spending time and summer recreation. At this time of year, gazebos are especially popular, where you can gather friends, have barbecue, chat, or take a break from the bustle of the city in peace and quiet. A gazebo made of wood with your own hands can be built step by step without the participation of professionals. To avoid mistakes during the construction process, you must follow some instructions and regulations.
It is worth noting that the key points in constructing a structure are the ability to take a responsible approach to the process of calculations and construction. If you don’t want to spend time and effort on construction, it’s best to entrust all the work to professionals. Of course, in this case you will have to pay not only for building materials, but also for people’s labor, however, the result will fully justify the money spent.
Advantages of wooden gazebos
The modern market offers a huge range of different building materials that are perfect for building a gazebo. Some of the presented materials have increased strength or, on the contrary, fragility.

Regardless of its simplicity, a do-it-yourself wooden gazebo is considered the best type of construction. The advantages of wooden structures are:
- durability and strength, which most often require treatment with specialized solutions;
- good combination with other building materials, for example, glass, metal, etc.;
- environmental friendliness;
- low cost;
- visual appeal directly related to the flexibility of the material;
- ease of construction or assembly on site.
In addition to the advantages of wood as a material, it is worth noting the relatively low requirements for placement. Among the most significant requirements are the following:
- the size of the gazebo must fully correspond to its original purpose (for large companies or modest family pastime);
- Before starting construction, you should spend time on a construction plan, which you can make yourself or download on the Internet;
- high-quality mixture of foundation and wood properly treated with antiseptic;
- In order for the building to have maximum strength and durability, it is necessary to check the foundation for strength and treat the wood with an antiseptic;
- the appearance of the garden plot and the gazebo are closely related to each other, which is why you should carefully consider the design of the building;
- Before erecting a wooden gazebo, it is necessary to prepare the construction site - level it and clear it of any obstacles.

It is worth considering that only with a responsible approach to the above requirements will the construction meet expectations. Otherwise, a wooden gazebo with your own hands will not last long.
Preparatory work:
Choosing a gazebo plan
Before starting the construction of a building, you need to think through its plan in detail. To do this, first of all, you need to decide on the type of structure. All kinds of buildings can be divided into two main types:
- open;
- closed.

A wooden gazebo for a closed type dacha is intended for use in both winter and summer. Such buildings have a dense roof and relatively blank walls.
Open structures have many more uses and subtypes, regardless of the fact that such buildings are used exclusively in the summer. These designs may be:
- buildings of various shapes in the form of fungi;
- awnings (tents) of various shapes and sizes;
- pergolas are arches firmly connected to each other into one single structure.
A wooden gazebo can take a variety of forms, among which it is worth noting:
- rectangular;
- round;
- hexagonal.
Depending on the shape of the gazebo, the complexity of its construction is determined. The simplest design is usually considered to be a rectangular design.
Separately, gazebos with grills can be noted. The uniqueness of such a building directly comes from the flammability of wood, which, be that as it may, is not a reason to build a structure from other materials.

To prevent possible fire safety problems, it is necessary to carefully treat the material with appropriate compounds. In addition, you can get rid of unnecessary problems by refusing to install a stationary fryer directly inside the building. If necessary, the grill should simply be taken outside the premises.
Selection of tools and materials
After the plan, type and shape of the gazebo have been selected, it is necessary to calculate the amount of building materials required and prepare the necessary tools. Basic materials include:
- piles;
- sand;
- crushed stone;
- cement;
- boards;
- fittings;
- brick;
- metal corners;
- wooden bars;
- screws or nails;
- various materials for roof finishing.
Having prepared the building materials, you need to check the availability of the tools necessary for installation work:
- hammer;
- chisel;
- electric plane;
- spanners;
- Circular Saw;
- screwdriver

In addition to the necessary components, you should first prepare compositions for wood processing. It is these liquids that determine the strength and fire safety of the future structure.
Construction of a gazebo
A do-it-yourself wooden gazebo should be built step by step in full accordance with the instructions. Each stage of construction requires the highest level of responsibility, including the planning stages.
Location
It is recommended to build a wooden gazebo exclusively on a hill so that rains, over time, do not cause the process of rotting. The distance between the structure and the house is determined directly by the owners. In some cases, the gazebo may be adjacent to the house, however, in this case, the buildings must have a similar appearance.

A wooden gazebo should fit perfectly not only with a residential building, but also with the natural environment. Wherever the structure is located, there should be a good view of the garden - flower bed, front garden, forest, etc.
When placing a gazebo in an open place, it is important to enclose the building with a fence, house walls or a wall of bushes. This is necessary to protect against the effects of wind and other negative factors. It is also worth taking care of the path, thanks to which you can easily get to the gazebo.
Foundation
Choosing a foundation for a gazebo is the most difficult part of the whole job. There can be several variations of the foundation at the base of the structure:
- tape;
- tiled;
- columnar.
The most commonly used and most accessible is the columnar type. This type of foundation is low cost and easy to install.

To build a columnar foundation you need:
- mark the territory using rope and wooden posts;
- remove the top soil layer from the marked part of the earth to a depth of 0.5 m;
- lay several layers of building materials at the base of the building: sand and crushed stone in layers of 10 cm, as well as concrete mortar in a layer of 30 cm;
- Apply a small layer of roofing material on top of the concrete solution;
- make several brick columns in 3-4 rows (necessary to provide greater distance between the ground and the floor of the structure to prevent the possibility of rotting);
- additionally cover the created base with a layer of roofing material.
The floorboard can be made in two ways. The first variation is based on the fact that the walls of the structure rest directly against the base of the gazebo. Another option is for the floor to sag between the support points.

The second gender variation is the most preferable due to its simplicity. This coating can be disassembled and updated without any problems.
The base of the floor for a gazebo is usually made of wooden beams with a cross-section of 10 by 10 cm. Of course, before installation, the beams must be properly treated with specialized solutions to prevent the possibility of rotting. For these purposes, it is recommended to use copper sulfate, which should be applied in several layers.
Gazebo frame
The main requirement for the gazebo frame is to ensure its openness. The building should be airy, without any blank walls.

When constructing the frame, boards and bars pre-treated with solutions are used. The plank base is secured with nails. The main support points of the structure are made of beams.
Wall cladding
The walls of the gazebo can be made in various ways. The simplest finishing option is ordinary plank cladding. However, to make the gazebo pleasing to the eye with an attractive appearance, you can use more original design methods. For example, make the walls of the building from weaving branches or use decorative mesh.
Additionally, you can make wooden railings, equip the building with windows, decorate the walls with openwork overlays and decorative carvings.

Also in some cases you can plant bindweed plants like hops, grapes or roses. These plants will not only decorate the garden plot, but also protect the structure from sunlight and wind.
Gazebo roof
A do-it-yourself wooden gazebo should have the same roof as a residential building. Multi-pitched roofs look most pleasant on gazebos, but due to the complexity of installation they are rarely used. Shed roofs are no less attractive, but have much fewer installation requirements.

The roofing material should be similar to that used on a residential building. When using slate, you need to cut a piece of the appropriate shape and nail it. If the roof of the gazebo is made of tiles, you must first strengthen the OSB slabs, and only then lay the bitumen shingles.
Interior design of the gazebo
This work process depends solely on the personal preferences of the owners and the original purpose of the gazebo. Inside the building you can place chairs, a sofa, banquettes, a table, etc. For greater convenience, electricity is often supplied to the gazebo.

It is worth paying attention that when wiring electricity, you need to pay attention to the easy flammability of wood. Thus, it is necessary to lay the wiring only along a special corrugated hose that can protect the material during short circuits and power surges.
The interior design of the gazebo is an individual matter for each owner. If you wish, you can make a unique design or be inspired by a ready-made one. One way or another, the gazebo is considered complete when the interior and exterior design completely suits the owners.
In a suburban area, an indispensable attribute is a gazebo. You can spend quality time with your family and friends in it. In addition, the structure protects from rain and sunlight on hot days. Despite the variety of modern materials, many people prefer to make it from wood.
With a little experience, as well as studying the instructions, the structure can be made with your own hands. In this article we will consider several options for building a wooden gazebo that will decorate the site.
Wood structures can be very different. If you decide to build a structure for the first time, then it is better to choose the simplest shape - square. The drawings of such a gazebo are quite simple, so everyone can figure them out.
First you need to choose a suitable place, and also decide on the appearance. After this, create drawings of the structure or use ready-made solutions. The diagram must indicate all dimensions, shape of the structure, entry location and other parameters. If you plan to build benches and a table into the structure, then they also need to be indicated in the sketch.

You also need to prepare a separate drawing of the roof and foundation, with its specifications. In addition, you need to take into account the consumption of wood processing products. The diagram must indicate the water supply, as well as electrical wiring and installation locations for lighting fixtures, if any are expected.

It is important to note that the success of construction depends on a competent drawing, so you need to take the preparation of the project seriously.
If you doubt that you can prepare a sketch yourself, you can use the services of professionals.

You need to understand that building a structure is a labor-intensive process, so you need to stock up on time and patience. It is recommended to strictly adhere to the prepared project. Provided that all stages of construction are carried out consistently, you can make a gazebo with your own hands in a couple of days. To do this, you need to purchase all materials in advance and prepare the necessary tools.
Foundation
After you decide on the location of the future structure, you need to clear it of debris and, if necessary, level it.

At the next stage, it is necessary to make markings by driving wedges into the corners, between which the lace is pulled.
The strength of a square structure depends on the correct angle, which should be 90 degrees.
If you want to build a small gazebo, then a columnar or strip foundation is best, since the square structure will have little weight.
To prepare the base, it is necessary to dig a pit, the depth of which does not exceed 80 cm. Then fill it with a 5-centimeter layer, followed by a 10-centimeter layer of cement mortar.
When the mixture hardens, you need to install vertical posts, which are temporarily fixed with special jibs. First, you need to place small metal pipes of the same size in the pit, pour concrete into them, and then secure the anchors. After about two days, the racks are attached.

Floor construction
At the next stage, using a 50X150 timber, make the strapping below the posts. Then the logs are laid out in increments of 45 cm, which are attached with horizontal strapping to the beam with special corners.

To attach the top trim, you need to install intermediate posts, which are fixed to the joists using ordinary nails. It is important to note that the racks must be strictly vertical. They are also needed so that the structure can support the weight of the roof.
As a floor covering, it is recommended to use edged boards, which must be pre-treated with special means to increase its service life. The material is attached on both sides. It is better to use self-tapping screws, as nails can split the board.

The next step is to make the top trim. To do this, you need to prepare a beam with a cross-section of 10X10 cm. The image below clearly shows an example of how this should be done.

Roof
Since the structure has a square shape, it is recommended to make a hipped roof. For manufacturing, you need to prepare inclined rafters from beams and secure them with nails. One edge of the strut needs to be secured to the rafter legs, and the other to the horizontal strapping.
The roof is covered with edged boards and fastened with self-tapping screws. Some experts recommend using plywood. Flexible tiles can be used as a covering.
At the final stage, all wooden elements must be coated with a double layer of varnish. This completes the construction of the square gazebo. If necessary, you can arrange furniture inside the room for a more comfortable stay.
You can also watch a video on this topic:
DIY gazebo made of wood and polycarbonate
Once the location for the future structure has been selected and a reliable foundation has been prepared, you need to begin installing the frame. It is recommended to use timber with a cross section of 60X60 mm as racks, which are fastened with wire and then with corners on self-tapping screws.
At the next stage, proceed to the lower, upper and middle trim. Horizontal bars are fixed with metal corners. On the side where the door will be installed, the middle trim is not needed.

If the structure is small, then you can make a pitched roof. The height of the highest point should not exceed 40 cm. This will be enough to ensure that water rolls off the roof and does not accumulate a lot of snow during the winter. The tilt should be directed in the opposite direction from the doorway.
For rafters, you can use beams with a cross section of 60x40 mm. First of all, the side rafter legs are attached, in the center there is a beam, and then the inclined beams. As a result, you should get five bars.
Now comes the most important process of constructing a gazebo - attaching polycarbonate. To do this, you need to drill holes in the sheets at a distance of 30 cm for self-tapping screws, which must be carefully screwed in.

If you need to cut sheets, it is better to use a hacksaw with fine teeth. You need to install a special profile on the sides.
For such a roof you will only need a few sheets, so you will not spend much time. Only the work must be done very carefully.
If necessary, carbonate sheets can be fixed to the walls of the gazebo if it is intended to be closed. There shouldn’t be any difficulties with the covering, the main thing is to buy high-quality polycarbonate.

From metal and wood: how to make a gazebo with your own hands?
If you decide to build a metal structure, then it is better to use a profile pipe, the wall thickness of which should be at least 2 mm. This is because round pipes are more difficult to weld.
If you intend to use a roof made of lightweight material: flexible tiles, corrugated sheets or slate, then a profile with a cross-section of 50x50 cm is suitable for the racks. And in the case of tiles, it is recommended to use a pipe with a cross-section of 75x75 cm. As jumpers, you can use a metal profile, the cross-section of which is not exceeds 50X50 cm.

The selected area must be cleared of debris and grass so that it does not rot under the floor. Then dig a hole and cover it with a layer of sand. Pipes can be installed directly into the ground.
Using a drill, make shallow holes, about 90 cm. Pipes are inserted into them and filled with crushed stone or construction waste, after which everything is carefully compacted. The stand must be filled with cement mortar.

Vertical posts must be checked using a plumb line.
If you need to raise the structure a little, it is recommended to use foundation blocks. Then place them over the entire area, as shown in the image below.

At the next stage, the lower piping is done; for this, pipes with a cross-section of 50X50 mm are laid on concrete blocks. The coals are welded by a machine. A profile with a cross section of 40x20 mm is suitable for the lintels; boards will be laid on them.

The profile must be coated with a primer, especially at the joints. The height of the racks should be slightly more than two meters. To strengthen them, the jibs should be welded.
 The middle harness should be at a height of about one meter. For this, a pipe with a cross section of 40x20 mm is used. To add rigidity, it is recommended to fix the vertical posts, as shown in the image below

If bitumen shingles are used as a roof, then the roof rafters should be made of wooden blocks with a cross-section of 75X40 mm. The sheathing can be made from wooden lining. At the top, the rafters are fastened with self-tapping screws.
Secure the board in the middle and nail a beam to it, on which the rafter system will rest.

The image below shows how to secure wooden jibs made of timber with a cross-section of 75X40 mm.

After this, you need to lay out the bitumen shingles.
A board with a section of 70X40 mm is used for the floor, and a board with a section of 70X20 mm is used for the walls.
In this way, you can build a structure using two types of materials in a few days. To install the structure, you need to have experience working with a welding machine, and at other stages, difficulties should not arise.
Gazebo made of wood and metal
Before starting construction work, you need to prepare a drawing or use ready-made options. The reliability of the manufactured frame depends on this.
The area for the future gazebo must be thoroughly cleaned, then a 15-centimeter layer of soil must be removed, then covered with sand, compacted and filled with concrete mortar.
When the mixture hardens, it is necessary to install support posts around the entire perimeter, to a depth of about one meter. For the bottom trim, a channel with a cross-section of 10X10 cm is used, and a 4X4 cm profile pipe is used on top. The central trim is also made, except for the side with the doorway.
To weld the rafter system, it is necessary to prepare a flat area. It is made of metal pipes with a cross section of 20x20 mm. First you need to prepare the ridge, then the corner parts. After lifting the structure, it needs to be further strengthened with pipes.
The finished frame must be cleaned of corrosion, then treated with a primer and painted.

The outside of the structure can also be finished with clapboard, having previously treated it with antiseptic agents. Forged parts are used as an additional decoration for the gazebo.
With an assistant, such a structure can be assembled within a few days, provided you have the necessary tools and drawings.
Beautiful gazebo made of stone (or brick) and wood

Before starting construction work, you need to correctly develop a drawing. Today it is not difficult to find ready-made solutions. If you have skills in working in a graphics editor, then it is possible to create a three-dimensional diagram. It is recommended to include material costs in the project.

After this, decide on the location and prepare the foundation. Since the stone structure will be quite heavy, it is recommended to make a strip foundation.
To do this, you need to dig a hole 70 cm deep, and drill pits along the edges with a depth of one and a half meters. Then cover with a 20-centimeter layer of sand.

At the next stage, install metal pipes and make wooden formwork around the perimeter. It is also necessary to install a frame of welded reinforcement in the trench. Then fill with cement mortar.

Fill the metal pipes with concrete and begin laying natural or artificial stone around them.

To build a stone gazebo, you need to have some experience, since stone is more difficult to lay compared to brick. If the structure is closed, then you need to build walls between the supports or a parapet.
Roofing work is no different from the construction of any other structure. If you plan to have a gable roof, then first you need to make a ridge. Then install the main rafters, followed by the intermediate ones.

When the frame is ready and installed on supports, it needs to be covered with a layer of waterproofing and covered with a lath. Then the roofing material is attached. It is recommended to finish the ceiling with clapboard or edged boards.
To create a comfortable atmosphere, it is recommended to furnish the gazebo with wooden pieces of furniture. Stone goes well with wood.
If you do not have experience working with stone, then it is better to turn to professional craftsmen who will build a structure for outdoor recreation in a short time.
Designs that people made with their own hands:


Gazebo made of wood and glass. Covered glass gazebo
Now you know how to build a gazebo using wood. But to protect from winds and rain, it is recommended to glaze the structure. There is nothing complicated about this, so almost every person can cope with this task.

If you want to make a glass roof, then the place for the gazebo should be shaded to avoid sunlight, otherwise, on hot days, it will be impossible to stay indoors.
The gazebo can be glazed with a warm or cold option.
- Warm glazing. If you are going to use the structure not only in summer, but also in winter, then you need to reduce heat losses. In this case, experts recommend using an aluminum profile.
- Cold glazing. This option is suitable if you are going to spend time in the gazebo only during the warm season.

To glaze the structure, you can use various systems.
Aluminum

This method has many advantages:
- Can be used for glazing structures of complex shapes.
- The profile allows you to create a convenient opening system.
- Large selection of double-glazed windows.
- Reliability.
- Possibility of installing large windows.
- Retains heat well.
Solid or frameless glazing

In this case, the walls of the wooden gazebo will be completely transparent. The advantages of this option:
- Attractive and lightweight design.
- Wide panorama.
- Combines with any style.
- Possibility of ventilation at any time.

Glazing can be ordered from specialists, but if you have experience working with glass, then it is better to do all the work yourself.
Video with examples of wooden gazebos:
Thus, if you have the necessary tools and materials, you can independently build a beautiful and reliable structure where you can meet friends or relax alone.
When it is built by non-professionals wooden gazebo with your own hands on a country plot, a lot of questions may arise if everything is not carefully thought out in advance. A gazebo is considered not such a complex structure that it takes a long time to prepare for its construction, however, as with any construction, you need to calculate everything “down to the millimeter” in advance so that after finishing the work you do not have to correct any mistakes. By studying the step-by-step instructions for building a standard wooden gazebo, you can reduce the cost of time, money and nerves during work. Even if a slightly different form of building is chosen, the main stages of construction are always the same. A garden gazebo made of wood often becomes the most favorite resting place on the site, so it is worth paying attention not only to the size and convenience of the structure, but also to its appearance.
Preparation
The most important thing in building a gazebo or any other structure is a detailed elaboration of the plan. To search for ideas, you can turn to numerous interior design magazines, specialized websites, video programs, etc. – original photos of wooden gazebos for summer cottages are always presented there. Creating a plan usually involves the following steps:
Choosing the form and purpose of the building. The shape of the gazebo can be very different: standard square or rectangular, round, hexagonal or octagonal, closed or open. Original owners may well build something fabulous on their property: a spaceship, Baba Yaga’s hut or a forester’s house.
The purpose of the gazebos also differs. If you just want to relax in the shade after working on the site, you can build a regular gazebo with a couple


