To prevent grass from growing under the shed. DIY summer terrace for your home. Bougainvillea: growing and care in the garden
Often in the summer we want to sit in a rocking chair in the fresh air, drink tea, read the newspaper... but many homeowners do not have a terrace on which to do this, or it is small and uncomfortable. Agree, placing furniture and sitting on the lawn is not always convenient. For example, after rain it will be damp, and it will not be good for the lawn. In this article I will tell you how to make a wooden terrace for your home with your own hands.
To begin with, we will need boards, beams, a lot of fasteners, cement, wood stain or paint, and wood impregnation will also come in handy. The tools we used were a circular saw, a jigsaw, a hand router, a screwdriver and an air gun, but you can also use hand tools. We will build using reliable frame technology. Think in advance and calculate the required amount of materials.
Based on the required size of the terrace, we mark future holes for the posts on the lawn. We did this using a rangefinder, a tape measure and a can of spray paint.

We dig a hole about 50 centimeters deep and about 20 centimeters in diameter. Fill it there, or stir cement right inside. It will be something like a support-column foundation. If your budget allows, you can think about the advantages of screw piles.

We put the posts of our terrace in cement. We made them from resin-impregnated timber 7x7 centimeters; thinner ones are not recommended. The racks are recessed into the cement, so it is especially important to maintain their correct position, without tilting or distortion. This design is not very durable, but it is cheap. Despite its simplicity, it can withstand up to ten years, which is quite enough until the next renovation of the veranda.
It is easier to install several racks at once with frame boards already nailed to them.
We baited them with a gun, and after the frame was completely assembled, we tightened the main screws. The racks were leveled using a level.


To make the structure rigid, we make a cross member, also installing the posts in cement. The bar itself is made double, for future installation of crossbars on both sides.

We have a drainpipe installed on the wall of our house, so we had to lay a pipe for it under the terrace. To do this, we dug a small ditch and laid an ordinary plastic pipe of the required length in it.

We lay a membrane or geotextile on the ground to prevent weeds from growing under the terrace and moisture from accumulating. Without it, the grass will quickly grow under the boards, moisture will accumulate in it, which will ultimately have a detrimental effect on the wood, which will begin to rot. It is advisable to first remove the turf layer. In theory, you can fill it with large crushed stone, this is better, but more expensive.

We install the crossbars. In the same way as the outer frame, we first adjust the boards using a nail gun, and after installing all the crossbars, we finally screw them in place.
This approach will help to avoid mistakes - the structure is easy to assemble and can be quickly disassembled.


Now it’s time to install the drainpipe outlet. We assemble the corner using adapters and connect it to the pipe laid under the terrace.


We also put geotextiles there, make cross bars, and install the steps themselves.

We install the frame on the main frame using boards with rounded edges. To do this, we took ordinary boards and processed their edges with a special cutter, however, if you do not have a manual router, you can purchase ready-made boards with rounded corners.

The frame is mounted immediately with large self-tapping screws.

We begin to lay the floor of the terrace. Since our deck is longer than the standard size of boards, we laid the boards as follows: first one whole and half a board on the left, and the next row is the opposite, first half a board and then the whole. This method of installing the floor has been known for a long time, and has a number of advantages; it looks more beautiful. Helps to avoid typical mistakes in frame construction and is also less susceptible to premature failure due to drying of the boards in one place of the seam.

So, the installation of the floor is completed, you can start sanding the boards, but... we decided that it would not be amiss to make a bench from the remaining material and fix it next to the edge of the terrace. This is due to the fact that in one place of our terrace it is not adjacent to the house due to a flower bed.
In this way we create both a permanent seating area and the edge of the terrace next to the flowerbed.

Let's start sanding the terrace. An orbital sander, or regular sandpaper - it's up to you to decide. I can only say that with electrical equipment the work is done several times faster. So don't skimp on a good power tool, it really makes life and repairs easier.

We paint the terrace with wood paint, after pre-treating it with an antiseptic. This will significantly extend the service life of the structure. Can be coated with varnish suitable for outdoor use, for example, yacht varnish. It is resistant to moisture and will help protect our terrace from the effects of bad weather conditions for many years.


The terrace is ready! Now you have a place for daily relaxation, family tea parties and just summer time.
Flower beds with ornamental grasses do wonders. They give the garden structure, movement, and are beautiful almost all year round. Caring for them is not difficult; the choice of species and varieties of various colors and shapes is huge.
Many types of grass have been bred by breeders to make their elegant appearance even more impressive. You can choose sizes (from short grass to two meters), shape and shades of stems and leaves.
The decoration is often inflorescences. Some of the natural, naturally growing species are widely used, and combinations of beautiful ornamental varieties provide endless possibilities.
The stems, leaves and flowers of ornamental grasses decorate the garden even after they dry out in the fall.
Ornamental grasses in the garden
Herbs can create a spectacular background for other plants, complement groups of trees, alpine hills and flower beds with heather; in small areas, large single species even replace bushes.
Moisture-loving species will find use near the pond. And a separate group of different, skillfully combined types of grasses is attractive and effective; the combination of ornamental grasses with several flowering perennials is simply irresistible. Ornamental grasses combined with simple perennials form modern steppe gardens, which are increasingly popular, colorful and pleasing to the eye, and also require almost no maintenance.
Foxtail featherweed (Pennisetum alopecuroides)
Growing
Grass species vary greatly in water requirements, and herbs should be planted and grouped accordingly. With a few exceptions, they are all frost-resistant and do not suffer from pests or diseases. They grow well if they receive nitrogen fertilizer in season; large, powerful species especially require nutrition. The ideal fertilizer for them is pickled nettle, which you prepare at home; it costs nothing and benefits not only the plants, but also the soil.
Never prune grasses in the fall. In addition to the fact that dry stems decorate the garden in winter, dry frost-resistant stems protect the sensitive center of the plant from freezing.
The easiest way to propagate ornamental grasses is to divide the root tussock in the spring, and if necessary in the fall.
Miscanthus, like most ornamental grasses, looks great with flowering perennials.
Types of the most popular types
Miscanthus
A lush growing herb that enjoys moist, sunny locations. Frost does not matter for this grass, but in winter the roots should not be constantly in wet soil. The abundantly flowering miscanthus (Miscanthus floridulus) will grow up to 3 meters high, the sugar miscanthus (Miscanthus sacchariflorus) is only half a meter lower. Many species of the popular Chinese miscanthus (Miscanthus sinensis) have been developed with white or yellow striped or spotted stems and leaves.
Buharnik (Holcus)
Buharnik, a species that grows in our nature, is absolutely unpretentious and can withstand moisture and drought, sun and shade. It grows to a height of about 30 cm; its striped variety is interesting.
Reedweed (Calamagrostis)
Rich bunches of narrow leaves are decorative even in late autumn. It will grow to a height of one and a half meters, it is relatively moisture-loving and prefers acidic soils. Several species grow in Europe, and many ornamental varieties have been bred.
Gray fescue (Festuce glauca)
Fescue (Festuca)
Fescue is a short grass that forms compact, clumping tufts that can be used as an undemanding ground cover. Mostly popular are species with gray and bluish, seemingly matte leaves. Golden fescue in May and June The gray fescue (Festuce glauca) produces golden spikelets of inflorescences in May and June. The plant needs dry, not very nutritious sandy soil and plenty of sunlight.
Sedge (Carex)
Many species of this fresh green, graceful herb are grown. All species like a fairly moist place in the shade. Palm sedge (Carex muskingumensis) is a hardy ornamental plant with beautiful dense leaves. Gray's sedge (Carex grayi) attracts mainly with its inflorescences, and then with its fruits, which look like prickly beads.
Pampas grass is a very impressive, but capricious look
Pampas grass or Cortaderia
A large, expressive grass more than two meters high that will decorate any corner of the garden. It attracts both with its dark green leaves and fluffy white inflorescences (the Rendatleri variety has pink petals). Cortaderia is thermophilic, so in winter it requires a sunny and sheltered habitat and protection from frost. For example, a high layer of autumn leaves.
It will benefit from permeable and nutritious soil; it does not tolerate wet soil, especially in winter - it is advisable to protect the plant even from rain and snow in wet winters. If the stems are tied at half or two-thirds of the height, they will serve as protection for themselves, and you can cover the top with non-woven material, and in the rain, with film.
Every year, new tools and materials are invented for use in garden plots. Most of the new products do not take root in garden plots, but some turn out to be very useful. One of these new products is geotextiles or geofabrics.
Geotextiles are a synthetic material that does not decompose in the ground. It was invented and began to be used in the creation of roads and pedestrian paths.
 You've probably seen more than once in cities how the tiles on the sidewalks begin to sag. This is due to the fact that the soil was poorly compacted before laying the tiles, or a gulley formed from melt water. It is in these places that the tiles sag.
 This phenomenon can be avoided if geotextiles are used when laying tiles. It is laid on the ground at the location of the path. Crushed stone is poured on top, then another layer of geotextile, then sand or a cement-sand mixture, and then the tiles are laid.
How does load balancing work? If the tiles are laid without geotextiles, then when walking along one line, the soil gradually shrinks along this line and the tiles sag.
In the case of using geotextiles, the load when walking along one line will no longer fall on the ground, but primarily on the entire geotextile fabric. But the entire mass of crushed stone and tiles presses on the canvas from above. Therefore, geotextiles cannot push the soil along the walking line. Because the entire mass of crushed stone, tiles, people and cars is distributed relatively evenly throughout the entire surface and, accordingly, evenly presses on the ground.
Accordingly, the No. 1 use of geotextiles in the garden plot.
 Lay it when constructing paths, recreation areas, and parking lots. Moreover, use it not only when laying tiles, but also if you have a coating in the form of crushed stone, screenings, pebbles, ASG, etc. Your paths and platforms will be level for a long time.

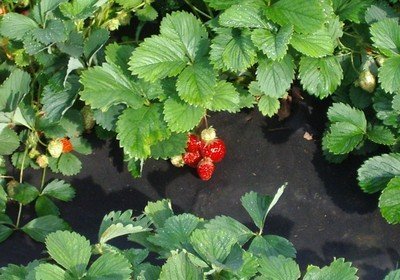
 Application No. 2 - geotextiles can be used as a covering for paths. Level the soil on the paths and cover it with geotextile. In this case, grass will not grow on the paths and they will be clean during rains.

In the photo - on the left the path is overgrown with grass, on the right the path is covered with geotextile - there is no grass.
At the Novosibirsk center for natural farming "Siyanie" we tested four types of geotextiles for five years.
 What we liked most was the imported geofabric. Strong, durable, aesthetic material. I liked everything except the price, which is three times higher than domestic analogues.
 The second type - non-woven geotextiles - did not impress us. We closed the paths for them and in the first year everything was fine, only it did not allow water to pass through well and it stood in puddles for a long time after the rains. The next year, holes formed in this geofabric, into which grass began to grow. And in the third year, this type of geotextile completely collapsed.


 We also laid the third type - needle-punched geotextiles of grade "D" - on the paths. After a season of use, we stopped using it to cover the ground. This geofabric is white and therefore stains of dirt on it are striking. Also, the white material distracts attention from the plants - it “hits the eyes.” And, most importantly, when walking, holes are rubbed in the material and grass grows in them. Moreover, this geotextile has a fibrous structure, and when the roots and stems of grass are woven into the fibers, there is no way to tear them out.
 But this geotextile turned out to be the best material for covering plants for the winter. We covered European roses, rhododendrons, conifers, thujas, and blueberries with them in the fall. All plants withstood the severe Siberian frosts well and quickly began to grow in the spring.


 The fourth type is woven geotextiles made of polypropylene grade “T”. He's been closing the tracks for four years now. During this time, despite intensive walking on it, this type of geotextile was completely preserved and was not damaged. Grass and weeds do not grow through it. It allows water to pass through and there are no puddles on the paths during rains and waterings. This brand of geotextile has a fairly reasonable cost and therefore it can be widely used in garden plots.
 The only disadvantage of this geofabric is that it gradually spreads into fibers and the edges begin to “fringe”. However, this can be easily avoided if two technological operations are performed when using it. After cutting a piece of geofabric, its edges must be melted over a fire (candle, gas burner). Then tuck the edge to a width of 3-5 cm. That is, the edge will be double and after that the geotextile should be laid on the ground and attached to it. As a result of these simple measures, the geofabric will no longer spread into fibers. If there is filling on top of the geotextile, then these operations do not need to be done.
How to attach geotextiles.
 The first option is to have wooden borders installed on your beds. In this case, attach the geofabric to the tree with staples using a construction stapler.
 The second option, geotextiles need to be fixed to the ground. In this case, lay it on the ground, having previously melted it and tucked the edges. The pieces are joined with an overlap of 5-10 cm. In the overlap areas, place washers for attaching thermal insulation (without dowels) and hammer a 200 mm long construction nail into the central hole. Place the washers every 50-70 cm.

 The third option is that you have space for garden beds, but they haven’t been made yet. Cover the entire area for the garden with geotextiles. Place borders of beds made of boards or galvanized on top and fasten them to the ground. Inside the beds, cut out the geotextile at a distance of 5-7 cm from the borders and pour the soil mixture on top. At the joints of the pieces of geotextile on the paths, fasten them with washers as described in option 2. If you will make decorative filling on top of the geotextile, then fastening with washers is not necessary.
Additional uses of geotextiles.
Protecting wooden borders from moisture.
 If you border raised beds with board borders, they will rot where they touch the ground. To avoid this, it is necessary to protect the wood from rotting. Regular impregnation with an antiseptic will help for a short time. It is also impossible to protect the inside of the board with plastic film. Because if moisture (rain, watering) gets into the space between the film and the boards, the wood will rot faster. Because moisture has nowhere to go except into the wood itself.
 If geotextiles are attached to the boards from the inside, then a thin air layer is formed between it and the boards. Ventilation will go through it, and excess moisture will drain into the ground through geotextiles.
The geofabric is attached to the boards with staples using a construction stapler.
Protecting the slopes of an organic trench from grass.

 One way to quickly make the soil in your garden beds fertile is to install organic trenches. Trenches are dug in place of the beds, they are filled with organic residues, to which the microbiological preparation “Shine-3” is added. Organic matter quickly, within 1.5-3 months, rots and the trenches are filled with fertile compost. Further, any garden crops are grown in them.
 But when constructing organic trenches, two side effects occur: when walking along the paths, the edges of the trench crumble and lawn or meadow grass from the paths actively penetrates into the compost.
 These side effects can be avoided as follows. Between the trenches we make paths 70-90 cm wide. We cover them with geotextiles, the edges of which should hang into the trenches and reach their bottom.
 We attach it to the ground with electrodes bent in the shape of the letter “P”. In place of the beds, we install borders made of boards or galvanized steel so that they protrude beyond the edge of the trenches onto the paths by 10-15 cm. After this, fill the trenches with organic residues or a soil mixture of earth and compost.
The curbs will prevent you from coming close to the edges of the trench and they will not crumble. Geotextiles will prevent grass from growing on the paths. You can pave the top of the path with backfill.
Covering plants.
You can use geotextiles to temporarily shelter plants from frost at night. It will protect your plants from more severe frosts than regular covering material or plastic film.
You can use geotextiles to temporarily shelter planted seedlings from the sun. If you planted seedlings in hot weather, they may dry out in the sun. Experiments have shown that covering planted seedlings with black materials (geotextiles, pots, boxes) improves their adaptation to new conditions. To cover plants, place arcs over them and throw geotextiles over them. The ends of the tunnel do not need to be closed; through them the plants will be illuminated with diffused light. Geotextiles can be removed in 5-7 days.
Similarly, we protect roses from the sun. It often happens when gardeners come to their garden plot in the spring and see that the rose shoots have turned black. They think that the roses froze in winter. This is not so - the roses were just burnt in the bright spring sun. Because of this, there are many cases when the snow has melted, gardeners see green shoots of roses and rejoice at it. And a week later they arrive and see that the shoots have turned black. This is precisely the effect of the sun, not frost. Therefore, in spring, seedlings must be protected from the sun until several leaves bloom.
 We tried to cover the roses in different ways - with covering material, as well as geotextiles of different brands. It is better to make winter shelter for roses with geofabric of grade “D”, and for spring protection from the sun with geofabric of grade “T”. Under it, roses are best preserved and begin to grow faster. Apparently this is due to the fact that black geofabric heats up better in the sun and the roses are in a mini-greenhouse.
Installation of drainage systems.

 Using geofabric, it is not at all necessary to make concrete or plastic drainage wells or trenches, or to lay pipes. It is enough to dig a well or a trench, cover its bottom and walls with geotextiles, fill it with gravel or crushed stone, cover it with geotextiles on top and fill it with soil. And your drainage system will drain water perfectly.
Construction of reservoirs.

 Geotextiles are placed at the bottom of a reservoir pit under waterproofing material to protect it from possible mechanical damage from foreign objects in the ground (nail, root, sharp stone, glass, etc.). It is much easier and cheaper to lay down geotextiles than to then look for where the waterproofing is damaged and seal it.
Construction of lawns.
 Geotextiles are laid at the location of the lawn on local depleted soil. Imported fertile soil is poured on top. It is thoroughly compacted and lawn grass seeds are sown. Thanks to geofabric, the soil under the lawn will be smooth all the time, and fertile soil will not mix with depleted soil.
 Strengthening the base for the foundation.
Geotextiles are laid under a strip foundation or monolithic slab to level the load on heaving soils.
 Limiting plant growth.
If fruit and ornamental trees and berry bushes are planted in a lawn or turf, then it is necessary to prevent the grass roots from penetrating into the fertile soil of the planting hole. To do this, the vertical edges of the pit are wrapped with geotextiles.
Application as technical fabric.

 You can cover things and shelves from dust with geotextiles in utility rooms. There is experience in temporarily closing the space under a house on screw piles.
Owners of suburban areas are increasingly using wide rolls of geotextile fabric when arranging their territory. What kind of material is this and for what purposes is it used? Let's try to figure it out. Non-woven material made from interwoven synthetic polymer fibers has excellent quality characteristics: it is wear-resistant and does not rot. Thanks to the optimal combination of characteristics, geotextiles are convenient to use in many areas of human activity: land management, construction, landscape design.
- Needle-punched geotextiles– created by pulling fastening threads through the warp using a barbed needle. It has excellent strength and excellent water permeability, due to which it is widely used in the construction of drainage systems.
- Thermally bonded geotextile– is made under the influence of heat treatment of the fabric, during which synthetic fibers are melted and more rigidly bonded to each other. It has a dense structure, high tensile strength, but lower filtration qualities.
Thanks to a special manufacturing technology, geotextiles have a number of undeniable advantages, the main ones among which are:
- Environmental friendliness. Geotextiles are not subject to decomposition into chemical components, thereby not causing harm to human health and the environment.
- Strength. Non-woven material is resistant to mechanical damage, piercing and tearing loads. The significant elongation of the material before breaking, which occurs due to the infinite length of the threads, virtually eliminates its damage during installation.
- Environmental resistance. It does not rot, does not silt or rot, and is resistant to ultraviolet radiation, acids, alkalis and organic substances.
- Easy to install. The material is produced in the form of small and lightweight rolls, which are convenient to transport and, if necessary, saw in half with a regular hand saw. During application, the material itself is convenient to cut with a knife or scissors.
- Economical in price. With excellent quality characteristics, the cost of geotextiles is quite low, due to which they are widely used both in industrial construction and for domestic needs in the development of suburban areas.
The possibilities of using the material amaze with the versatility of agrofibre. At the same time, with the release of new brands of geotextiles, the range of use of the material is constantly growing.

Geotextiles are environmentally friendly materials: under the influence of ultraviolet radiation they do not form any by-products

Thermally bonded geotextiles are used in road construction, agriculture, and for strengthening slopes and banks of reservoirs.
How can geotextiles be used on a site?
Geotextiles allow you to implement any ideas for geoplastic transformation of the landscape on a site. Using non-woven material, you can create new design compositions, transforming the appearance of the site.
Option #1 – improving the quality of garden paths
It is difficult to imagine a site without winding paths running deep into the garden. When planning their arrangement, you always want the result to be a beautiful and functional element of landscape design that will serve you well for more than one season.
The use of agrofibre allows you to maintain decorative properties and extend service life. After all, even installing a small path on a site requires a lot of effort: excavating soil, backfilling the underlying “cushion,” laying the coating itself. But during operation, when layers of gravel or sand gradually sink into the ground, depressions, bumps and irregularities begin to appear on the surface of the path.
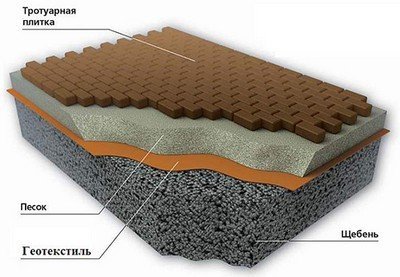
A layer of geotextile laid between the soil and gravel backfill allows you to evenly redistribute the load and prevent mixing of layers
It is convenient to use non-woven material when arranging sandy paths and gravel areas. Geotextiles placed between the soil and the backfill material optimize compaction so that the fill material will have virtually no penetration into the soil. And this will significantly contribute to reducing the consumption of bulk material - and therefore overall savings. In addition, the canvas will facilitate the rapid outflow of water and prevent the germination of weeds and grasses. In swampy and soft areas of soil, non-woven material will even perform the function of durable reinforcement.
Option #2 – waterproofing artificial reservoirs

When making a children's sandbox, so that the sand does not trample into the ground and does not mix with the ground, you just need to cover the bottom of the pit with a layer of geotextile
Option #4 – arrangement of foundations and retaining walls
The strength and durability of any building directly depends on the reliability of its foundation. If we talk about concrete types of foundations, then considerable damage is caused to them by capillary wetting with groundwater. Thermally bonded geotextiles help improve the waterproofing of a monolithic foundation.

When arranging foundations, geotextiles are used to separate fine-grained soil and gravel fill in order to prevent mixing of layers, and at the same time capillary wetting of walls
The material can simultaneously perform two functions: to separate layers and provide effective drainage, preventing prolonged contact of the surface of the concrete base with moisture.
Option #5 – green roof
By planting cultivated plants in holes made in the canvas, you provide the plants with comfortable conditions for development, and save yourself from labor-intensive weeding
It is no secret that many ornamental plants are “picky” by nature. They require special care, preferring a special soil composition, which often differs from the prevailing soil on the site.

You can differentiate between different types of fertile soils by creating improvised “pockets” for planting certain varieties using the same geotextiles
Creating an artificial landscape on depleted soils requires the development of a fertile layer, which, under the influence of natural conditions, is washed out into thinner layers. An additional layer of canvas will prevent contamination of infertile soils and their leaching. Thanks to the non-woven fabric, plant roots will not grow into infertile soils.
Off-season night frosts also pose a great danger to plants. The material will also help out in the hot summer months, covering the delicate foliage from the scorching rays of the sun.

Using agrofibre, you can also protect the above-ground parts of plants. To do this, during cold weather it is enough to cover them with a cloth.
Geotextiles are a universal material, the use of which does not require special skills. Its use greatly simplifies work in the garden and landscaping.
Paths between garden beds in the country are a rather sore point for almost all avid gardeners who have not yet solved this problem. Since cultivated plants require care in any weather, the row spacing should always be in order.
Thanks to the correct path covering, this process, as well as harvesting, can be carried out in any weather conditions. And besides, properly equipped passages should not become a breeding ground for weeds.
Why is it necessary to cover paths?
There are several reasons for high-quality arrangement of paths with one or another coating. Most of them are well known to the owners of the plots, but still they are worth identifying again.

- The first reason is that the paths are constantly overgrown with weeds that grow into the beds or drop seeds that fall into the territory of cultivated plants. All this eventually turns into an endless struggle for the harvest.
- If you completely remove the weeds, but then leave the soil open, then in rainy weather it will be impossible to approach the beds without wearing rubber boots, which will then take a long time to clean from the wet soil stuck to them. Otherwise, the soil stuck to the shoes will spread throughout the remaining covered areas of the yard, and then will certainly end up in the living areas of the house.
- In addition, strips of uncovered soil completely cleared of weeds contribute to the very rapid evaporation of moisture from the beds. Therefore, water consumption for irrigation increases significantly.
- Another reason to arrange paths between the rows is to obtain absolute maximum comfort when working in the garden, and as a result, a significant increase in the productivity of this noble work.
- A vegetable garden with neatly decorated paths always looks more aesthetically pleasing than one with ordinary earthen or densely overgrown weeds.
All the negative aspects mentioned above in no way improve your mood, since even having vegetables, berries or herbs “at hand”, it is quite difficult to collect them from the garden both during rain and for quite a long time after it. Therefore, you will have to wait until the soil dries and is not slippery and sticky.
In a word, high-quality paths between the beds should be the goal of any self-respecting gardener.
Criteria for choosing coverage for paths between beds
To figure out which covering option for a garden path will be optimal, you first need to understand what criteria it must meet. “Indiscriminate” use of everything that comes to hand can lead to the material of the paths seriously harming the crop.
So, the coating must meet the following requirements:
- The material used is environmentally friendly, unable to harm either plants or soil during the entire period of operation.
- The coating is UV resistant and does not allow sunlight to pass through.
- The material is not afraid of moisture and is waterproof;
- Since the paths can also be used in the autumn, “waiting” for the ripening of late crops, a material is needed that is not afraid of temperature changes, even down to negative values.
- The material ideally allows air to pass through, that is, it is “breathable.”;
- The coating is strong and durable, not subject to rotting or other biological or chemical decomposition.
To make it easier for readers to choose a method for making paths in the garden, options for arranging them will be considered below.
Features of arranging paths between beds
When choosing a method for designing row spacing, you should not completely identify them with the paths that are laid across the site for constant movement, since they have a slightly different structural design. Garden paths are arranged as a permanent element of the site, but row spacing can sometimes change their location.

Some owners create permanent beds in their home areas, similar to flower beds, laying concrete or tiled paths around them. However, this option is not entirely rational, since the soil in the beds is gradually depleted, and even if it is actively enriched with various fertilizers, it will have to be changed periodically, removing the old layer and filling it with fresh soil. If the row spacing is filled with concrete, then this area can no longer be used as a garden bed. In addition, concrete does not allow the soil to breathe normally and excess moisture to evaporate, which can negatively affect cultivated plants growing in beds next to such a covering.
Therefore, zealous gardeners, taking care of every piece of land on their acres, prefer paths that, if necessary, can be moved to another place, for example, swap them with beds when planting a vegetable garden next spring.
Considering these conditions, it can be assumed that ready-made covering material that meets all the above criteria, or a well-thought-out scheme for arranging such row spacing, thanks to which they will be met, will be suitable for garden paths.
The principle of arranging passages between beds is quite simple. It can be divided into several successive stages:
- The first step is to carefully remove weeds and their roots from the surface of the row.
- Next, the cleaned area is compacted and leveled.

- Then, a material is laid on the path that does not allow or at least partially blocks the sun's rays.
- One of the bulk, slab, roll or other construction or available materials can be laid on top of this covering.
This “light” version of the path can always be easily dismantled and moved to another area of the garden.
Materials for forming paths between beds
Now we need to consider the materials used to create paths between the rows of the beds.
Substrates for coating
Several different materials can be chosen as a layer that will cover the soil from the sun's rays - geotextiles of a certain thickness, black plastic film, roofing felt, as well as sheets of cardboard or even old newspapers laid in several layers.
Prices for geotextiles
geotextiles

- Geotextiles is the best option, since it is intended specifically for laying on the ground under the main top covering and has all the qualities necessary for this function.
- Polyethylene film is used more often because it has a more affordable price. But this material is still characterized by a number of disadvantages. Firstly, the film does not allow water to pass through and this will have to be taken into account when forming the path, making it so that water does not linger on its surface. Secondly, the film is not a “breathable” material, which means that the moisture accumulated under it will not evaporate normally, which can lead to the formation of fungal colonies under it that can seriously harm the crop.

- Ruberoid can also be used for flooring under walkway coverings, but it has the same disadvantages as plastic film. But compared to it, its durability is higher, it has greater density and thickness, and can withstand mechanical loads better. True, it is also much more expensive than polyethylene.

- Paper or cardboard bedding It will fit perfectly according to all the above criteria, but it is, of course, short-lived and will have to be changed several times a season, especially if the summer turns out to be rainy. By the way, experts do not particularly recommend getting carried away with newspaper layers, since printing ink cannot be called environmentally friendly.
What is geotextile?
Many of the owners of country plots are probably not even familiar with this name, not to mention information about the advantages of the material itself. A special article on our portal will help fill this gap - it will tell you in detail.
Path covering
Bulk building materials, such as shavings, sand and fine crushed stone, can be laid on the substrate as a protective layer. It is practiced to lay stone or concrete tiles, which, however, are not permanently installed, that is, the seams are not sealed with concrete mortar, but are simply covered with sand. In addition, for arranging paths, special plastic and rubber plates are produced, as well as roll coverings made from crumb rubber. The finished products meet all the necessary requirements for outdoor use.

- Sand , poured onto a substrate, perfectly protects the path from the germination of weeds, does not retain water on the surface and allows the soil to “breathe” freely. There are two disadvantages of this material. The first is its pronounced flowability, especially in a dry state, so it is recommended to lay it in a space enclosed on all sides by walls. And the second is that it sticks to shoes and bare feet, which means that sand will be spread throughout the yard and will certainly get into the house. Therefore, sand is rarely used as an independent path surface. It is more often used as a leveling and shock-absorbing bedding under stone or tile laying, and it is also used to fill the seams between these products. The layer of sand under the masonry is usually at least 50 mm.

- Wood shavings, sawdust or small wood chips also well suited for filling rows. They allow air and water to pass through perfectly, so the paths are always kept dry and comfortable to walk on. In addition, rotted natural wood over the years of use can also serve as fertilizer. The disadvantages of such backfill include the fact that it will be necessary to build wooden boxes for it so that it is in one place and is not particularly blown away by the rising wind. The best bedding for it is geotextile, which is also water-permeable and strong enough that, if necessary, it can be rolled up along with the shavings and moved to another area of the garden.

- Crushed stone or stone chips can be called the best option from bulk materials, since these materials are durable, allow water and air to pass through, do not stick to shoes and are not blown around the area by the wind. Paths designed in this way look neat and always clean. However, to prevent crushed stone from mixing with the soil underneath, a reliable base is required, for which it is recommended to use geotextiles with a thickness of at least 2.5÷3 mm with a high density, otherwise the sharp edges of the stone can damage the litter. You can also lay thick cardboard under the crumbs, but there is no guarantee that the paper will not become soggy from rainwater and the stone will not fall into the ground.

- Covering with plastic bottle caps is another option for arranging row-spacing beds. Such a “carpet” can be removable, that is, portable, or installed on a permanent basis. In the latter case, the covers are installed in a layer of uncured concrete mortar poured onto the path. However, this area of the garden can no longer be used as a garden bed. The “mobile” version of the cover made from lids, one might say, will cost practically nothing, but its production will require a lot of time, since all the prepared elements must be fastened together with thick fishing line or a durable thread that is resistant to moisture, ultraviolet radiation and temperature changes. Moreover, for the connection, four holes must be made in each of the covers - they are usually melted using a heated awl.

The lids can be combined to create a specific design or pattern - for this purpose, parts of the required color are specially selected and an ornament is made from them according to the sketch. If there is no artistic streak, then nothing prevents you from fastening them together chaotically - the result will also be a very entertaining picture. The lids should not be tightly pulled together, but they should not hang loosely either. If they are fastened relatively loosely, then the resulting “carpet” can be easily rolled up and moved to another place.
This covering is laid on a geotextile backing, which will prevent the germination of weeds, and the covers will create an outwardly interesting and convenient path. It should be noted that it is pleasant to walk on such a surface barefoot, so some craftsmen make massage mats for feet from the covers. If you like this idea of arranging paths, then you need to start collecting covers without delay, since you will need a very large number of them.

- Stone or concrete makes the paths strong and rigid, and it will be comfortable to walk on such a surface. But if cement is used to lay them, then this area cannot be used for planting in the future. Therefore, if you want to lay out the paths with any kind of similar tiles, then you should make a bedding of sand under them on the substrate, and fill the seams with it. In this case, water from the surface will easily drain into the ground, and if it is necessary to move the path to another place, the tiles from such a base can be easily dismantled.
Prices for paving slabs
paving slabs
 A very good solution for any garden or vegetable garden - rubber tiles "REZIPLIT-20"
 - Rubber tiles is also often used to cover paths between beds. It can be laid on well-compacted and leveled soil, even without a backing. The tiles are easy to install and dismantle, they are durable and will serve as a path for many years. Thus, manufacturers give it a guarantee for operation, subject to recommendations, for 10–20 years. The range of permissible temperatures is very wide - it varies from -40 to +90 degrees, so the material does not even need to be dismantled for the winter.
Rubber tile coating is used not only for garden paths - it is intended for arranging car areas, floors in garages and industrial workshops, and based on these factors we can draw a conclusion about how durable and reliable the material is. The tile does not slip, as there is a relief pattern on its surface. It is made from environmentally friendly ingredients, so it does not emit harmful substances and will not negatively affect the quality of vegetables. In addition, the rubber does not transmit light to the ground, so weeds will not grow on the path. However, rubber tiles do not allow moisture to pass through, so they must be laid in such a way that water flows off the surface to the sides. The standard dimensions of the tiles shown as an example in the illustration above are 550x550 mm, the thickness may vary, but it is best to choose options at least 20 mm thick. Rubber tiles are usually equipped with locking joints, which is very convenient - after installation, even under load, the coating will not spread.

- Rolled, modular covering, as well as tiles made of rubber crumbs – all of these products have approximately similar characteristics and are intended specifically for the design of garden and garden paths, as well as various areas, including automobile ones. This material is made from rubber that is crushed and compressed into various forms. Thanks to this manufacturing technology, the rubber coating becomes water- and breathable, and therefore does not create a “greenhouse effect” for the soil. The material does not allow sunlight to pass through, so weeds will not grow on the path. Such tiles do not slip, as they have a distinctly rough surface, and this makes paths paved with them completely safe for use in any weather. Rubber crumb coating is easy to care for, as it can be easily washed with water from a hose, and this process can be done immediately while watering the beds.
The material is resistant to wear and temperature changes, so it does not need to be removed from the garden for the winter. The coating is not subject to mechanical damage and rotting. In a word – sheer advantages!

Installation of roll and tile coverings is very simple - they are laid on a well-leveled soil surface, cleared of weed roots and compacted, without the use of a substrate. Under the influence of temperature changes, from negative to extremely high, which can occur on the soil surface, the coating does not soften or dry out.
Roll coverings are produced in widths of 500 and lengths of 3500 mm. Its thickness may vary, but 10 mm is enough for arranging paths.
Rubber tiles can have different configurations, but they always fit perfectly together, creating a durable coating due to interlocking connections.
Any coating made using this technology is not only practical, but also very aesthetically pleasing. Paths made with this material look neat and are very pleasant to walk on.
The only drawback of any crumb rubber coating is its rather high price.

- Plastic perforated tiles for garden paths are another very successful option for designing row spacing. The covering of these modules is easy to assemble and disassemble, and it can be laid on weed-free and compacted soil or on a permeable substrate. Plastic slabs can be used several times, and not only for covering paths, but also for arranging playgrounds or picnic areas.
The wear resistance of this coating is ensured by the primary polypropylene used for its manufacture. It is odorless and does not emit harmful substances into the environment, so the material can safely be called environmentally friendly. Another manufacturing option is also made from completely safe polyvinyl chloride (PVC).
Prices for molds for making tiles
mold for making tiles

The plates have increased impact resistance and can be used in a temperature range from -30 to +50 degrees.
The modules are connected to each other using special clamps that come with them.
The advantage of all ready-made coverings, both roll and modular, is their simple and quick installation and dismantling, which is especially important if you need to equip a building that is used only in the summer. In the absence of the owners, ill-wishers may visit the site and are able, so to speak, to borrow the coverage for their own needs. Therefore, in the winter, it is best to collect the modules or mats from the paths, wash, dry and put them away in the premises of outbuildings.
At the same time, in areas with permanent residence, row spacing is left covered year-round, since the material is designed for use at both low and high temperatures.
Compost paths
It is impossible not to mention the compost paths between the rows, which are arranged by experienced gardeners. There is even a triple benefit here:
- Natural fertilizer for garden beds is being produced;
- The paths are provided with a coating on which it is quite possible to walk without getting your shoes dirty.
- The problem of recycling plant waste, which can be placed in compost in any quantity, is being solved.

The work of arranging such paths is quite labor-intensive, as it requires physical effort. However, gardeners are no strangers to digging up beds. So, measures to create compost rows are carried out in the following order:
- The first step is to mark the territory - this determines the location of the beds themselves and the paths between them. Marking is carried out using wooden pegs or ordinary branches that can be stuck into the ground. This process will help make the beds and paths smooth and neat.
- The next stage is to dig up the soil - first in the garden bed, then on the path. Moreover, the path is not just dug up, but deepened by 300÷400 mm, and fertile soil selected from the resulting ditch is thrown onto
- Next, raw materials for future compost are placed between the rows. First, if there is any, manure or chicken droppings are thrown onto the ground - it will certainly attract earthworms, which will speed up the processing of plant waste. Not too thick branches or corn stalks are laid on top of the manure - this layer will create air cavities that are necessary for the normal functioning of working bacteria. The next layer is grass, cabbage leaves and fallen leaves from trees, as well as waste from cleaning vegetables, which can be periodically added to compost ditches. They should be filled almost to the top.

- After this, it is recommended to water the entire contents of the compost trenches with water, and then with a special preparation containing living, but temporarily “dormant” bacteria. This product is diluted in a bucket of warm water, a little sugar is added to activate the bacteria, then the solution is left to stand in the sun for 30-40 minutes. Next, the solution is poured into a watering can, and the compost ditches are watered from it. Some drugs may be prepared differently - instructions for this are always included with the package.
- Filled trenches treated with bioactive substances are covered with geotextiles. If compost rows are laid out in the spring, then a roll or modular covering is laid on top of the geotextiles, which can be walked on. If this process is carried out in the fall, then stones are simply placed on top of the covering material, which will press the canvas and will not allow the wind to move it to the side.
It is best to arrange compost rows in the fall, when there is a lot of plant material. In winter, snow will cover the geotextile, and inside the ditch it will be warm and humid, which is very important for the quality functioning of the created bio-environment, which will do most of its “work” during the autumn-winter period.
Next fall, when the compost is ready, the beds and row spacing can be swapped and compost paths created in the place of the former beds. In this way, the entire garden is gradually fertilized.
Prices for plastic tiles for garden paths
plastic tiles for garden paths
Compost is perhaps the best fertilizer for the garden!
And what is most important is that it can be obtained in the required quantities practically for free, only by making certain efforts and creating the necessary conditions for this. And one of the conditions is a well-equipped one, the variety of designs of which and methods of their installation are described in detail in a special article on our portal.
Let's summarize. Obviously, if you wish and have time, the paths between the beds can be made independently, without resorting to outside help. Moreover, as a last resort, for this purpose you can use improvised materials that can always be found on the site. In addition to regular paths, it would be most practical to make compost paths - this way you can significantly save on fertilizers and get high-quality environmentally friendly compost without chemical additives. In this case, the paths will not only create comfort when working in the garden, but will also help you get a rich harvest.
Video: Tips for creating compost paths between beds


